

Building a solid wood door is a rewarding DIY project that allows you to create a high-quality, custom piece for your home. Whether you’re adding a door to your interior or exterior, solid wood doors offer unmatched durability, timeless aesthetics, and excellent insulation.
In this guide, we will walk you through the key steps of how to build a solid wood door, discuss its benefits, and highlight the challenges you may face along the way.
Whether you’re a seasoned woodworker or just starting with your solid wood door DIY project, this article is designed to help you understand the essential techniques and considerations involved in the process.
Overview of Solid Wood Doors: Interior vs. Exterior, Panel vs. Flush
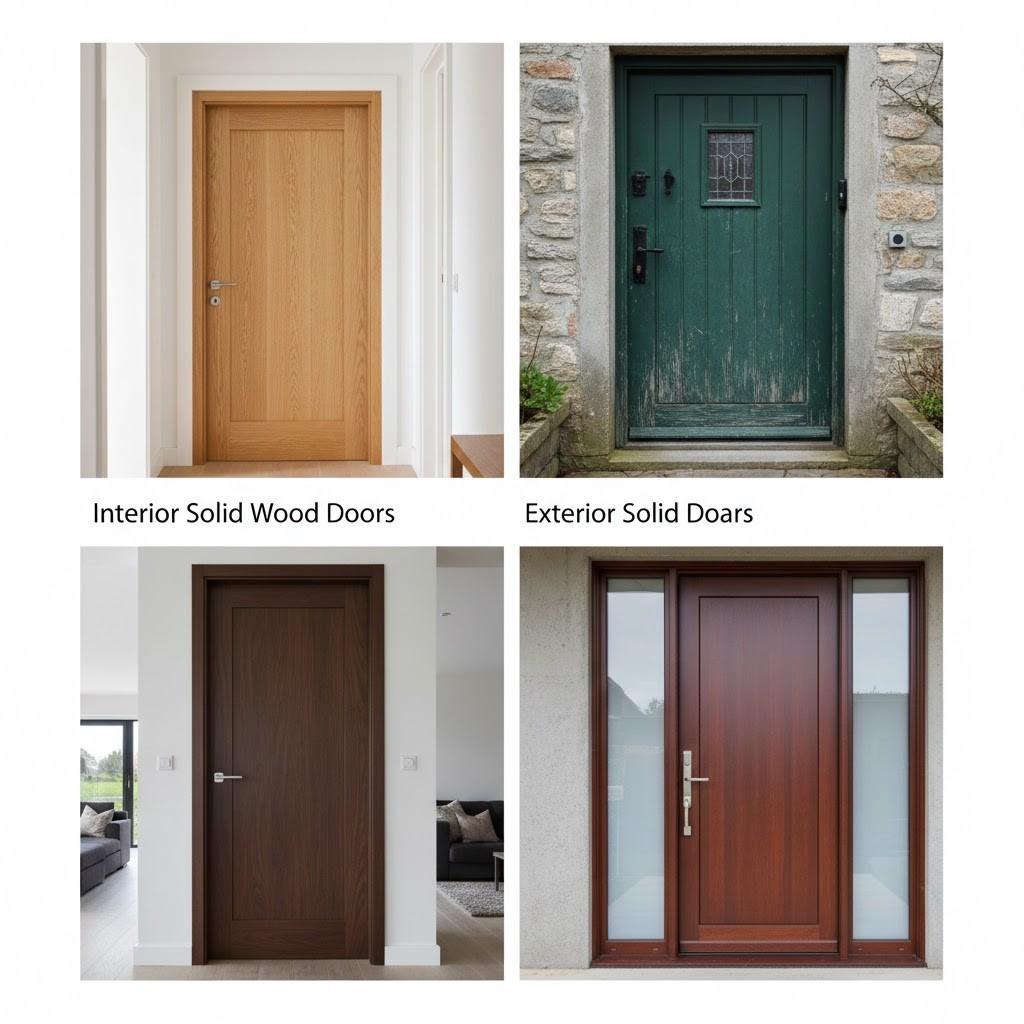
Solid wood doors come in a variety of styles, primarily categorized by their intended use—interior vs. exterior—and their design—panel vs. flush. Interior solid wood doors are typically smaller and simpler, with thinner wood panels, while exterior solid wood doors are designed to be more durable, often with thicker construction and additional weatherproofing.
The two main design types are panel doors, which feature multiple raised or recessed sections of wood, and flush doors, which are smooth and flat, offering a more modern look.
Understanding these distinctions will help you choose the right type of solid wood door for your project. For instance, if you’re building a door for an exterior entryway, you’ll want to ensure that it has proper insulation and weather resistance, whereas an interior door might focus more on aesthetic value.
The Benefits of Building a Solid Wood Door

- Durability: Solid wood doors are known for their strength and long lifespan. They resist wear and tear better than hollow core doors, providing security and a sturdy barrier. When well-maintained, solid wood doors can last for decades.
- Aesthetic Appeal: One of the primary reasons homeowners choose to build a solid wood door is the timeless beauty of natural wood. The grain patterns and finish options allow you to match your door to various home styles, from traditional to contemporary.
- Insulation: Solid wood offers excellent insulation properties, both in terms of sound and temperature. A well-constructed solid wood door can help keep your home quieter and more energy-efficient by reducing heat loss and noise transfer.
Challenges in Building a Solid Wood Door
While building a solid wood door is an exciting project, there are several challenges to consider:
- Wood Selection: Choosing the right type of wood is crucial. Different species have varying levels of durability, ease of workability, and aesthetic appeal. Hardwoods like oak and walnut are ideal for doors due to their strength, but they can be harder to work with compared to softer woods like pine.
- Cutting and Joinery: Accurate cutting and joining techniques are essential to ensure that the door fits properly and is structurally sound. You’ll need to use precise measurements and reliable joinery methods, such as mortise and tenon, to achieve the best results.
- Finishing: Proper finishing is key to protecting your solid wood door from the elements, especially if it’s intended for exterior use. Sanding, staining, and sealing will ensure the door looks good and lasts longer.
Safety Considerations
When building a solid wood door, safety should be a top priority. Make sure to use proper safety equipment such as goggles, gloves, and hearing protection.
Work in a well-ventilated area, especially when using power tools or finishing products that may produce fumes. Always follow the manufacturer’s instructions for the tools and materials you’re using.
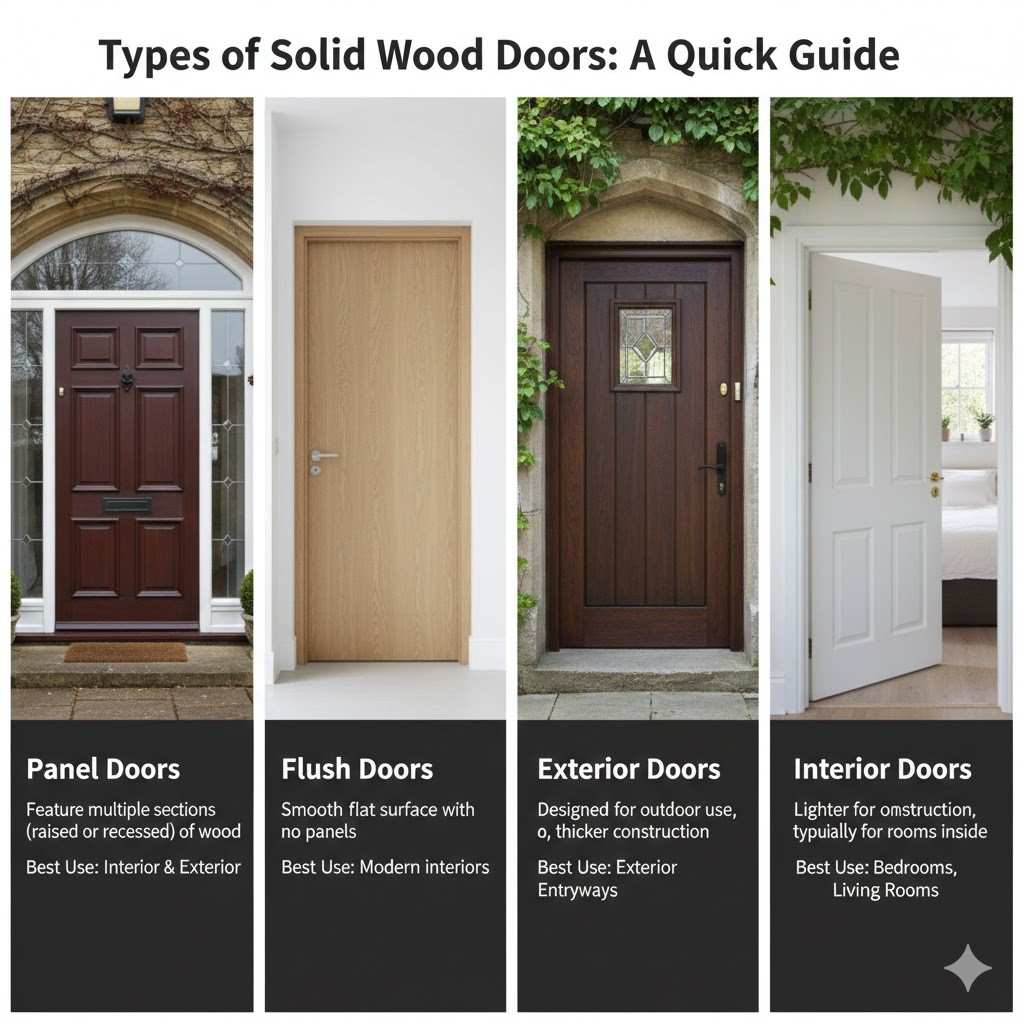
Types of Solid Wood Doors: A Quick Guide

| Type | Description | Best Use |
|---|---|---|
| Panel Doors | Feature multiple sections (raised or recessed) of wood | Interior & Exterior |
| Flush Doors | Smooth, flat surface with no panels | Modern interiors |
| Exterior Doors | Designed for outdoor use, thicker construction | Exterior Entryways |
| Interior Doors | Lighter construction, typically for rooms inside | Bedrooms, Living Rooms |
By understanding these basics of how to build a solid wood door, you’re well on your way to creating a durable, beautiful, and functional door that can enhance any room in your home.
Whether you’re interested in solid wood door construction for a simple interior door or a more complex exterior model, the benefits of this DIY project are clear.
Tools and Materials Required to Build a Solid Wood Door
Building a solid wood door is an exciting and rewarding project that requires a variety of tools and materials to ensure that the door is both sturdy and visually appealing.
Whether you’re a beginner or a seasoned woodworker, knowing what tools and materials you need beforehand will help streamline the process and avoid delays.
In this section, we’ll break down the essential hand tools, power tools, and materials required to successfully complete your solid wood door DIY project. We’ll also cover the best wood for solid wood doors, wood joinery for doors, and tips on using each tool.
Essential Hand Tools
When it comes to hand tools, having the right equipment is key to achieving clean cuts and accurate measurements. Here’s a breakdown of the essential hand tools you’ll need for building a solid wood door:
- Measuring Tape: A reliable measuring tape is indispensable for accurately measuring door dimensions, wood pieces, and joinery placement.
- Pros: Highly portable, easy to use.
- Cons: Can stretch over time, affecting accuracy.
- Tips: Always use a high-quality, durable measuring tape to ensure precise measurements.
- Squares: A carpenter’s square is crucial for ensuring that your cuts and joinery are square and true.
- Pros: Essential for accurate angles, particularly for the door frame.
- Cons: Requires careful handling to avoid misalignment.
- Tips: Use a metal square for more accurate measurements and durability.
- Chisels: Chisels are necessary for finer detailing, such as creating mortise cuts for the door hinges and other joinery.
- Pros: Perfect for precise, clean cuts in wood.
- Cons: Requires a steady hand and practice to use correctly.
- Tips: Invest in a set of sharp chisels to minimize the risk of mistakes during cuts.
- Clamps: Clamps are essential for holding pieces of wood in place while you work on them, particularly during the gluing and assembly stages.
- Pros: Helps maintain stability for accurate cuts and gluing.
- Cons: Can be bulky and may require multiple clamps.
- Tips: Use adjustable clamps to ensure flexibility when working with different wood thicknesses.
Power Tools
While hand tools are important, power tools will help you speed up the process and achieve professional results. Here are the power tools that will make your solid wood door build easier and more efficient:
- Table Saw: Ideal for making straight cuts on larger panels of wood.
- Blade Selection Tips: Use a carbide-tipped blade for clean, precise cuts.
- Pros: Offers a high degree of precision and control.
- Cons: Requires a stable setup and experience to use safely.
- Circular Saw: A portable alternative to the table saw for straight cuts.
- Blade Selection Tips: Use a fine-toothed blade for smoother cuts in solid wood.
- Pros: Easy to maneuver, great for cutting large sheets of wood.
- Cons: Less precise than a table saw; may require a guide rail for more accurate cuts.
- Router: The router is great for shaping edges, hollowing out areas, or cutting joinery details such as mortises.
- Pros: Adds beautiful, custom details to your woodwork.
- Cons: Can be tricky to control for beginners.
- Tips: Practice with a router on scrap wood before using it on your actual door.
- Drill: Used for drilling holes for screws, hinges, and hardware.
- Pros: Essential for creating clean, precise holes.
- Cons: Can cause splintering if not handled carefully.
- Tips: Use a pilot hole to prevent splitting the wood, especially when working with hardwoods.
- Planer: A planer is used to smooth out rough wood surfaces and achieve the desired thickness.
- Pros: Ensures a smooth finish on your door panels.
- Cons: Can be noisy and require a steady hand.
- Tips: Use the planer in increments, removing small amounts of wood at a time.
Materials Needed
Choosing the right materials is critical for the durability and aesthetic appeal of your solid wood door. Here are the key materials you’ll need for building your door:
- Wood Types:
- Oak: Strong and durable, making it a great option for exterior doors.
- Maple: A light-colored wood with a fine grain, suitable for interior doors.
- Pine: Affordable and easy to work with, perfect for interior doors.
- Mahogany: A premium wood choice known for its rich color and smooth texture, ideal for high-end doors.
- Wood Glue: Essential for bonding wood pieces together, especially when creating joints.
- Tips: Use high-strength wood glue for added durability.
- Screws and Hinges: These are necessary for attaching the door frame to its opening.
- Tips: Choose screws that are long enough to secure the door but not too long to avoid splitting the wood.
- Finish: The final step in completing your door is to apply a protective finish, such as stain or polyurethane.
- Tips: Choose a finish that complements your wood type and provides adequate protection against the elements, especially for exterior doors.
- Wood Thickness Recommendations: For a sturdy door, aim for a thickness of at least 1 ¾ inches for the door panel and 1 ¼ inches for the frame.
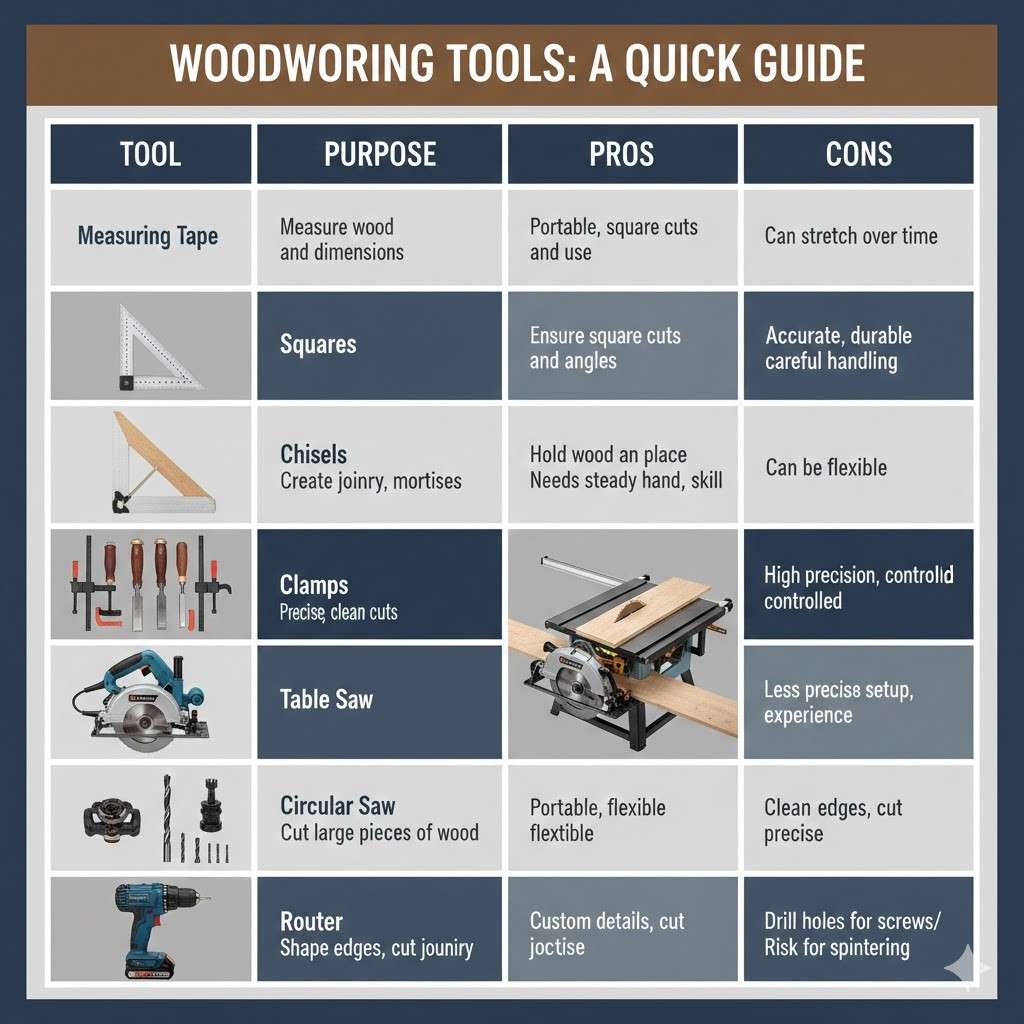
Tool vs. Purpose vs. Pros/Cons
| Tool | Purpose | Pros | Cons |
|---|---|---|---|
| Measuring Tape | Measure wood and dimensions | Portable, easy to use | Can stretch over time |
| Squares | Ensure square cuts and angles | Accurate, durable | Requires careful handling |
| Chisels | Create joinery, mortises | Precise, clean cuts | Needs steady hand, skill |
| Clamps | Hold wood in place for cuts/glue | Stable, flexible | Can be bulky |
| Table Saw | Cut large panels of wood | High precision, controlled | Requires setup, experience |
| Circular Saw | Cut large pieces of wood | Portable, flexible | Less precise than table saw |
| Router | Shape edges, cut joinery | Custom details, precise | Tricky for beginners |
| Drill | Drill holes for screws/hinges | Clean holes, precise | Risk of splintering |
| Planer | Smooth rough wood surfaces | Smoother finish | Noisy, requires control |
Equipped with the right tools for building a solid wood door and the proper wood joinery for doors, you can ensure a smooth and successful DIY project.
By selecting the best wood for solid wood doors, you will be able to create a door that not only looks beautiful but also stands the test of time.
Selecting the Right Wood for Your Door
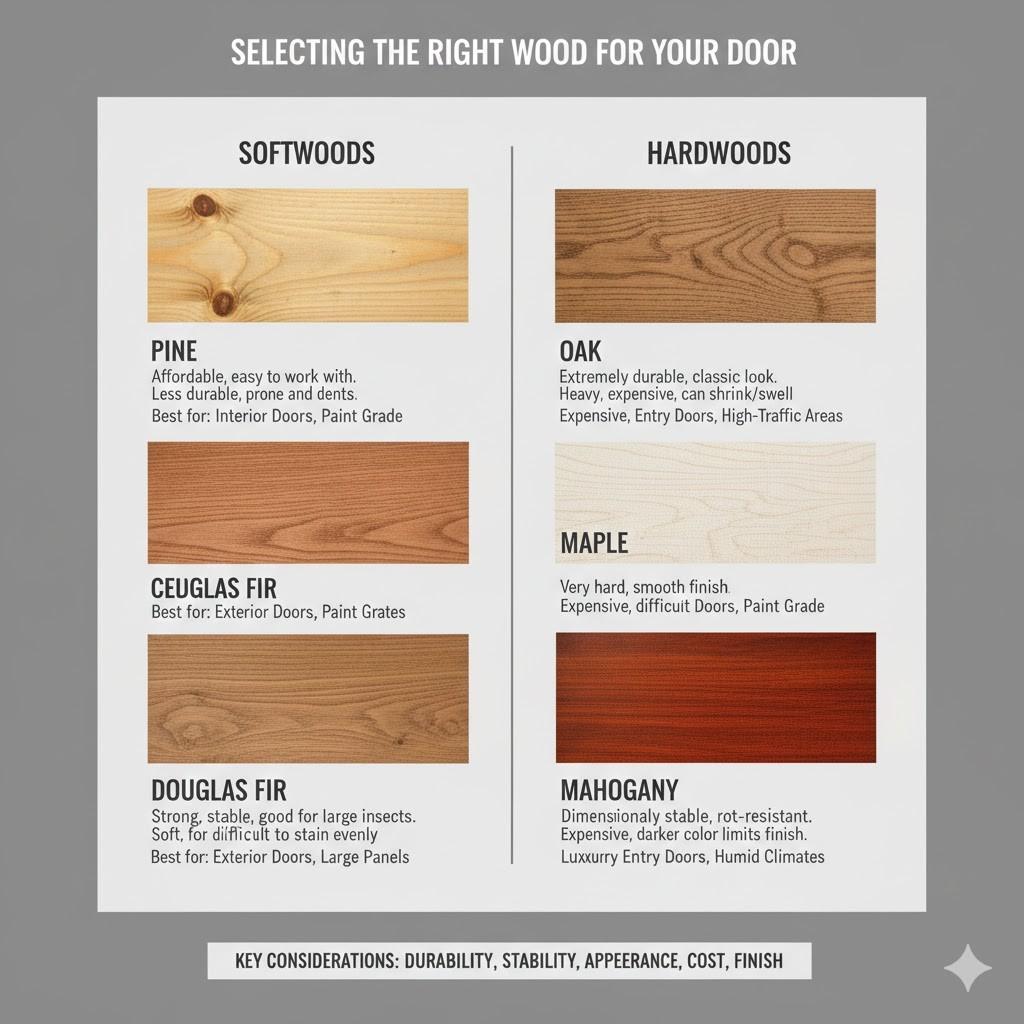
Choosing the right wood for your door is one of the most important steps in the solid wood door construction process. The wood you select will determine not only the durability and aesthetics of your door but also how easy it is to work with and how well it holds up over time.
Different types of wood come with unique characteristics that influence their performance, appearance, and cost.
In this section, we’ll guide you through the most common wood species used for building doors, discuss the differences between interior and exterior solid wood doors, and explain how to properly prepare your lumber for construction.
Wood Species Comparison
When selecting the best wood for solid wood doors, it’s essential to consider factors like durability, workability, and cost. Here’s a comparison of some popular wood species used in solid lumber doors:
- Oak: Oak is one of the most popular choices for solid wood doors due to its strength, durability, and distinctive grain pattern. It’s an excellent choice for both interior and exterior doors.
- Durability: High – resistant to wear and impact.
- Workability: Medium – can be tough on tools but takes stain and finish well.
- Cost: Moderate – oak is readily available, but it can be more expensive than softer woods like pine.
- Maple: Known for its smooth texture and light color, maple is often used for interior doors, particularly where a modern, clean aesthetic is desired.
- Durability: High – hard and resistant to scratches.
- Workability: Easy – maple is relatively easy to work with and holds up well to staining and finishing.
- Cost: Moderate to High – generally more expensive than pine but less costly than mahogany.
- Cherry: Cherry wood has a rich, reddish-brown hue that darkens with age. It’s often used for high-end interior doors.
- Durability: Medium – strong but softer than oak or maple.
- Workability: Easy – it’s easy to shape and finish, making it a favorite among woodworkers.
- Cost: High – cherry is one of the more expensive options.
- Pine: Pine is one of the most affordable wood options and is commonly used for interior doors.
- Durability: Low to Medium – pine is soft and can dent or scratch more easily.
- Workability: Easy – it’s easy to cut and shape, making it ideal for DIY projects.
- Cost: Low – pine is budget-friendly, but it may not be as long-lasting as harder woods.
- Mahogany: Known for its deep reddish-brown color and luxurious appearance, mahogany is often chosen for exterior doors and high-end interior projects.
- Durability: High – very resistant to rot, making it an excellent choice for exterior doors.
- Workability: Medium – it’s easy to work with but can be expensive and harder to source.
- Cost: High – mahogany is on the pricier side, but it provides exceptional longevity and visual appeal.
Exterior vs. Interior Doors
When selecting wood for a solid wood door, it’s important to consider whether it will be used for interior or exterior purposes.
- Exterior Doors: These doors are exposed to the elements, so it’s essential to choose a weather-resistant wood with a high moisture tolerance. Woods like mahogany and oak are ideal for exterior doors because they are dense and resistant to moisture, ensuring they won’t warp or degrade over time. Cedar is another excellent choice for exterior doors due to its natural resistance to rot and insects.
- Interior Doors: For interior doors, wood species such as pine, maple, and cherry are commonly used. These woods are not as concerned with moisture resistance but should still provide durability and aesthetic appeal. They are generally less expensive than exterior woods and are easier to work with.
Preparing Lumber for Construction
Before beginning your solid wood door construction, it’s essential to properly prepare your lumber. Properly prepared wood ensures a smooth, professional finish and helps the door last longer.
Here are some tips on preparing lumber for your door project:
- Drying: Ensure that the wood is properly dried to prevent warping or cracking over time. Kiln-dried lumber is often the best option for stability.
- Sanding: Sand the wood thoroughly to remove rough spots, splinters, and imperfections. Use progressively finer grit sandpaper to create a smooth, even surface for finishing.
- Joint Preparation: Properly prepare your joints, whether you’re using mortise-and-tenon, dovetail, or another joinery method. Make sure each joint is clean and tight to ensure the strength and durability of your solid wood door.
Wood Type vs. Durability vs. Cost vs. Best Use
| Wood Type | Durability | Cost | Best Use |
|---|---|---|---|
| Oak | High – strong, durable | Moderate | Interior & Exterior |
| Maple | High – hard, scratch-resistant | Moderate to High | Interior Doors |
| Cherry | Medium – strong but softer | High | High-End Interior Doors |
| Pine | Low to Medium – soft | Low | Interior Doors |
| Mahogany | High – rot-resistant | High | Exterior & High-End Interior Doors |
When choosing the best wood for solid wood doors, it’s important to balance durability, workability, and cost against your desired aesthetic and functionality.
By selecting the right wood for your project, you’ll ensure that your door not only looks beautiful but also stands the test of time, making it a lasting addition to your home.
Door Design and Planning
Designing and planning your custom solid wood door build is one of the most exciting parts of the process. It allows you to bring your vision to life, whether you’re creating a panel door design for an interior space or a sturdy, weather-resistant exterior door.
Proper planning will ensure that your door fits perfectly in its frame, complements the aesthetic of your home, and functions as intended.
In this section, we’ll guide you through different door types and styles, help you understand standard door dimensions and measurements, and provide tips for sketching out your design.
Door Types and Styles
The first step in your solid wood door plans is deciding on the type and style of door that suits your needs. Here are some popular door styles:
- Panel Door: The panel door is the most common type for both interior and exterior use. It features multiple raised or recessed sections of wood, creating a decorative and sturdy design. Panel doors are available in many variations, such as single or multi-panel designs, and can be customized to fit various architectural styles.
- Flush Door: A flush door has a smooth, flat surface with no panels. It offers a sleek, modern look and is often used for interior doors. Flush doors are relatively simple to build and work well in minimalist or contemporary spaces.
- Barn Door: Barn doors have become a popular choice for both interior and exterior applications, offering a rustic, charming aesthetic. Typically sliding, these doors are often used to save space and add character to a room. Barn doors can be designed with panels or a more streamlined appearance.
- Dutch Door: Dutch doors are split horizontally, allowing the top and bottom to operate independently. These doors are typically used for exterior applications, like in kitchens or entryways, where you might want to keep pets inside or allow airflow without fully opening the door.
Door Dimensions and Measurements
When planning your door, it’s important to know the standard door dimensions for both interior and exterior uses and account for frame and clearance:
- Standard Interior Door Sizes: The most common interior door dimensions are 30, 32, and 36 inches in width, with a standard height of 80 inches. These sizes are suitable for most rooms, including bedrooms, bathrooms, and living areas. However, you can adjust the dimensions based on your specific needs.
- Standard Exterior Door Sizes: Exterior doors are typically wider and heavier than interior doors. Common exterior door dimensions include 36 inches in width and 80 inches in height, but you might also encounter double doors or doors with sidelights that are larger. When planning for an exterior door, consider the thickness of the door for additional weather resistance.
- Accounting for Frame and Clearance: When measuring for a door, it’s important to account for the door frame and the clearance needed for smooth operation. A typical clearance of 1/8 to 1/4 inch on all sides of the door allows for proper swinging and sealing.
Sketching Your Design
Once you’ve decided on the type and size of your door, it’s time to sketch your design. A clear plan will help you visualize the end result and ensure that the door fits perfectly within your space. Here are some step-by-step tips for drawing and planning:
- Draw Your Door’s Dimensions: Start by outlining the basic shape of your door to scale, incorporating the measurements you’ve taken. Use graph paper or a computer program to ensure accuracy.
- Design the Panel Layout: For a rail and stile door or any panel door design, plan out how many panels you want, their shape, and the arrangement (vertical or horizontal). Use symmetry to create a visually appealing layout.
- Add Joinery Details: Mark where you will place the joinery, such as mortises and tenons, to connect the panels and rails. Adding these details early in your design phase will ensure everything fits together properly during construction.
- Consider Additional Features: Think about any additional features you’d like to include, such as windows, handles, or decorative inlays. Mark these on your sketch as well.
See also How Much Does Drywall Repair Cost
Door Type vs. Panels vs. Dimensions vs. Use
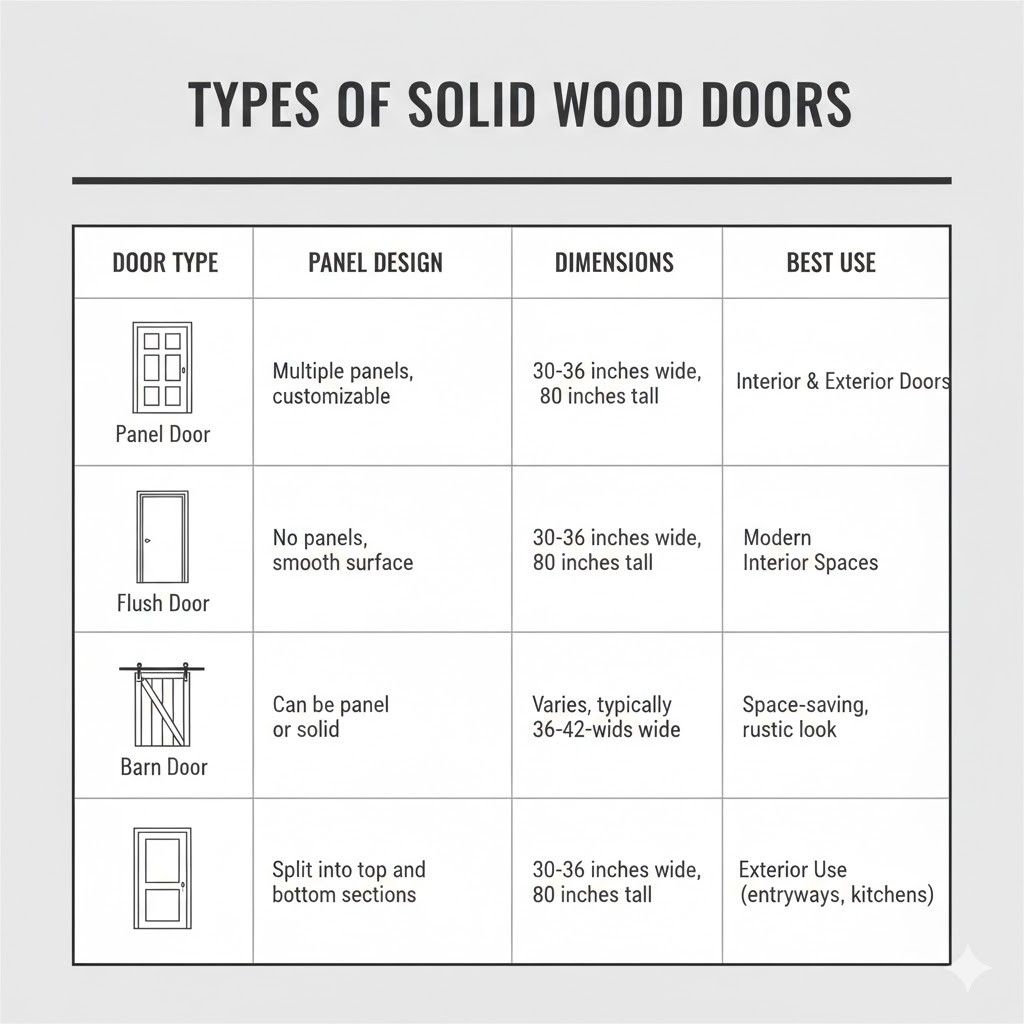
| Door Type | Panel Design | Dimensions | Best Use |
|---|---|---|---|
| Panel Door | Multiple panels, customizable | 30-36 inches wide, 80 inches tall | Interior & Exterior Doors |
| Flush Door | No panels, smooth surface | 30-36 inches wide, 80 inches tall | Modern Interior Spaces |
| Barn Door | Can be panel or solid | Varies, typically 36-42 inches wide | Space-saving, rustic look |
| Dutch Door | Split into top and bottom sections | 30-36 inches wide, 80 inches tall | Exterior Use (entryways, kitchens) |
By understanding the types and sizes of doors and sketching out your design carefully, you can create a solid wood door that not only meets your functional needs but also enhances the aesthetic appeal of your space.
Planning is key to a successful custom solid wood door build, so take the time to perfect your design before diving into construction.
Preparing and Cutting Wood for Your Door
Preparing and cutting the wood for your solid wood door is a critical part of the process, as precise cuts will ensure a professional-quality result.
Whether you’re working with a panel door design or a flush door, understanding how to properly measure, mark, and cut the wood is essential for successful wood joinery for doors.
This section will guide you through the step-by-step process of cutting wood for your door panels, rails, and stiles, offering tips for accuracy and efficiency.
Measuring and Marking
Before you even begin cutting, it’s important to take precise measurements and mark the wood clearly. Proper marking ensures that your cuts are straight, accurate, and aligned with your design.
- Straight Lines: Using a ruler or measuring tape, carefully measure the dimensions of the wood pieces you need. Be sure to double-check all measurements, as even small errors can affect the final fit.
- Chalk Line: For longer cuts, use a chalk line to create a straight line along your measurement. Snap the line tightly to leave a visible mark on the wood, making it easier to cut precisely.
- Ruler and Square: After marking your cut lines, use a carpenter’s square or a speed square to ensure that your lines are perfectly perpendicular or parallel. This is especially crucial when cutting the rails and stiles, as accurate angles are needed for perfect joinery.
Cutting Rails and Stiles
The rails and stiles are the framework of your door and require precise cutting to fit together seamlessly. Here’s how to make accurate cuts:
- Use a Table Saw or Circular Saw: If you’re cutting straight pieces for the rails and stiles, the table saw is your best option for consistent, accurate cuts. Set the saw to the desired width and feed the wood through slowly, ensuring a clean, straight cut. If a table saw isn’t available, you can use a circular saw with a guide to achieve the same results.
- Cut the Rails: The rails are the horizontal pieces of your door. Measure and mark the desired length for each rail. Once marked, make your cuts, ensuring they’re square at both ends. Use the square to verify accuracy before cutting.
- Cut the Stiles: The stiles are the vertical pieces of the door. These should be cut to the door’s full height, minus the thickness of the rails. As with the rails, ensure the cuts are square, especially where the stiles will meet the rails.
Cutting Door Panels
The door panels are the center sections of the door that fit within the rails and stiles. Cutting them correctly is crucial for both aesthetics and functionality, especially if your design includes grooves or coped edges.
- Panel Thickness: Measure and cut the door panels to the desired thickness. The thickness of the panel will depend on the style of door you’re building and the look you want to achieve. For solid wood doors, panels are usually around ¾ inch thick, but this can vary based on personal preference.
- Groove Cuts: If you’re creating a panel door design, you’ll need to cut grooves in the rails and stiles to hold the panels. Use a router or a table saw with a dado blade to make these groove cuts. The grooves should be deep enough to hold the panel securely but not so deep that they weaken the frame.
- Coping the Ends: If your design involves intricate joinery, you might need to cope the ends of the rails or stiles to fit precisely into the adjoining pieces. This can be done using a router or a jigsaw with a coping blade. Make sure to test-fit the joints before final assembly to ensure a tight, clean connection.
Safety Tips

When cutting wood, safety should always be your top priority. Using the proper personal protective equipment (PPE) and following safe cutting practices will help prevent accidents and ensure you have a smooth, successful project.
- Wear PPE: Always wear safety goggles to protect your eyes from flying wood chips and sawdust. A dust mask is also recommended, especially when cutting large amounts of wood or using tools like a table saw or router, as they generate a lot of dust. Additionally, use hearing protection when operating loud power tools.
- Use a Proper Cutting Setup: When using a table saw or circular saw, ensure that the saw is securely positioned and stable before cutting. Make sure the blade is sharp and the saw’s settings are adjusted for the wood you’re cutting. Always keep your hands away from the cutting area and use a push stick if necessary to guide the wood through the blade.
- Cut in a Well-Ventilated Area: Cutting solid wood can produce a lot of sawdust, so be sure to work in a well-ventilated area, ideally with a dust collection system or at least a fan to move the air. This not only helps with visibility but also reduces the buildup of sawdust that can pose a health risk.
Table: Part vs. Dimensions vs. Cutting Tool
| Part | Dimensions | Cutting Tool |
|---|---|---|
| Rails | Width based on design (typically 2-3 inches wide) | Table Saw or Circular Saw |
| Stiles | Height based on door dimensions (usually 80 inches) | Table Saw or Circular Saw |
| Panels | ¾ inch thickness (adjust based on design) | Table Saw, Router (for grooves) |
| Grooves | Depth to fit panel securely (approx. ½ inch) | Router or Table Saw with Dado Blade |
| Coping | End of stiles or rails (exact fit) | Router or Jigsaw with Coping Blade |
By following these steps for cutting solid wood door components accurately and safely, you can ensure that your door is both well-crafted and durable.
Whether you’re learning how to cut wood door panels or perfecting your wood joinery for doors, precision is key. Remember, the more carefully you prepare and cut your wood, the better the final result will be.
See also How to Pick the Right Solid Wood Door for Interiors?
Joinery Techniques for Solid Wood Doors

When constructing a solid wood door, the wood joinery for doors plays a crucial role in ensuring strength, stability, and a professional finish.
Whether you are creating a door panel assembly for a traditional panel door or using other joinery methods for modern designs, the quality of the joints is key to the door’s durability.
In this section, we will explain several effective joinery techniques for solid wood door construction, including mortise and tenon joints, dowels and biscuit joints, and tips for glue-up and clamping. We’ll also discuss common mistakes to avoid in door joinery.
Mortise and Tenon Joints
The mortise and tenon joint is one of the strongest and most traditional joinery methods for doors. It consists of two parts: the tenon, which is a protruding end on one piece of wood, and the mortise, a corresponding hole or slot in the other piece.
This joint is commonly used for connecting the rails to the stiles of a solid wood door, as it provides both strength and aesthetic appeal.
Step-by-step process:
- Mark the Mortise: On the rail or stile, mark the location and dimensions for the mortise. The mortise should be slightly deeper than the thickness of the tenon.
- Cut the Mortise: Use a chisel and mallet to carefully remove the wood for the mortise. Alternatively, a router or drill press can be used for cleaner cuts.
- Create the Tenon: On the opposite piece, cut the tenon by trimming the end of the wood to the desired width and length. Ensure that it fits snugly into the mortise.
- Test the Fit: Dry-fit the joint to ensure that the tenon fits into the mortise without gaps.
- Glue and Assemble: Once the fit is confirmed, apply wood glue to the tenon and mortise and assemble the pieces. Use clamps to hold the pieces in place while the glue dries.
Pros:
- Strong and stable, providing excellent support for the door.
- Aesthetically pleasing with a clean, traditional look.
- Can be used for both structural and decorative purposes.
Cons:
- Requires precise cutting and tools (e.g., chisels, saws).
- Time-consuming and requires skill for perfect alignment.
Doweling and Biscuit Joints
For a simpler and faster joinery method, dowel joints and biscuit joints are excellent alternatives to mortise and tenon. These joints use small round wooden dowels or biscuits to align and hold the pieces of wood together.
Advantages:
- Doweling: Dowels are cylindrical wooden rods that fit into corresponding holes in two pieces of wood. They provide strong, precise alignment and are relatively easy to use.
- Biscuit Joinery: Biscuit joints use flat, oval-shaped pieces of wood (biscuits) inserted into grooves cut into the wood pieces. The biscuit swells when glue is applied, providing a strong bond and alignment.
When to use:
- Dowels are great for door panel assembly where the rails and stiles are connected, offering a clean look and extra strength.
- Biscuit joints are ideal for panel door designs where you need additional alignment for larger panels.
Steps for Doweling:
- Mark the Hole Locations: Use a doweling jig to precisely mark where the dowels will be inserted.
- Drill the Holes: Drill matching holes in both the rail and stile, ensuring they are aligned.
- Insert the Dowels: Apply glue to the dowels and holes, then join the pieces together.
- Clamp and Align: Clamp the pieces to ensure the dowels are properly aligned while the glue dries.
Steps for Biscuit Joinery:
- Cut Biscuit Slots: Use a biscuit joiner to cut slots in the edges of both pieces.
- Insert Biscuits: Apply glue to the slots and insert the biscuits.
- Align and Clamp: Join the pieces together and clamp them until the glue dries.
Pros:
- Faster and easier to execute compared to mortise and tenon joints.
- Dowels provide a strong, tight bond, while biscuits add alignment support.
Cons:
- Biscuit joints don’t offer the same level of strength as mortise and tenon.
- Doweling requires precise drilling for accurate alignment.
Glue-Up and Clamping
Once your joints are assembled, it’s time to focus on the glue-up and clamping process. This is where accuracy in alignment ensures the door comes together correctly.
- Prepare for Glue-Up: Apply wood glue to the joints and the surface areas where the wood meets. Make sure not to over-apply, as excess glue can cause issues with finishing.
- Align the Pieces: Before clamping, ensure that the rails, stiles, and panels are properly aligned. For panel doors, align the edges of the panels with the frame. Use a square to check the angles for accuracy.
- Clamp the Pieces: Use bar clamps or C-clamps to apply pressure evenly across the entire door. Start in the center and work your way outwards to ensure even pressure and alignment. Allow the glue to dry for at least 30 minutes to 1 hour, but follow the manufacturer’s instructions for full drying time.
- Check for Square: Once clamped, check the door frame to make sure it is square. Adjust the clamps if necessary before the glue sets.
Common Mistakes in Door Joinery
Even experienced woodworkers can make mistakes when assembling a solid wood door. Here are some common errors to avoid:
- Misaligned Joints: If the joints aren’t aligned properly, the door won’t be square, and the assembly may not be stable. Always double-check the alignment before gluing.
- Gaps Between Pieces: Gaps in the joints are a sign of poor fitting. Make sure each joint is snug before applying glue.
- Wood Warping: Wood can warp if it’s not properly dried or if it’s exposed to moisture during construction. Always use dry, properly stored lumber to avoid this problem.
Table: Joinery Type vs Strength vs Ease vs Tools Needed
| Joinery Type | Strength | Ease of Use | Tools Needed |
|---|---|---|---|
| Mortise & Tenon | High – durable and strong | Difficult – requires precision | Saw, chisel, mallet, square |
| Doweling | Medium – strong, but less than mortise and tenon | Moderate – requires a doweling jig | Doweling jig, drill |
| Biscuit Joinery | Medium – provides alignment but not as strong | Easy – fast to use | Biscuit joiner, clamps |
| Glue-Up | Medium – depends on joinery method | Easy – straightforward | Clamps, wood glue |
Using the right wood joinery for doors will not only enhance the strength and stability of your door but will also give it a professional, polished look.
Whether you’re opting for traditional mortise and tenon joints or faster dowel and biscuit joinery, careful planning, cutting, and clamping are essential to ensure a solid door that will last for years.
By avoiding common mistakes and following these techniques, you’ll achieve a beautifully crafted solid wood door with impeccable joinery.
Assembling the Solid Wood Door
Once you’ve cut all the necessary components for your solid wood door DIY project, the next step is to carefully assemble them into a sturdy, functional door.
Assembling a solid wood door involves putting together the rails, stiles, and panels in a way that ensures the door is both strong and square.
This guide will walk you through each step, from laying out the frame to inserting the panels, checking alignment, and allowing the glue to dry.
Laying Out the Frame
The first step in assembling your solid wood door is to lay out the frame, which includes the rails (horizontal pieces) and the stiles (vertical pieces).
This is where your careful measurements and cuts will come into play, as it’s essential that the pieces fit together perfectly.
- Place the Stiles and Rails: Lay the stiles out in a square position on your work surface, placing the rails in between. Make sure the top and bottom rails are placed in alignment with the stiles.
- Mark for Joinery: If you are using mortise and tenon, dowels, or biscuit joinery, mark the spots where the joints will meet on the rails and stiles. Use a pencil or marking tool to ensure precise placement.
- Dry Fit the Frame: Before securing anything with glue, dry-fit the pieces together. This is your chance to make sure everything aligns properly. If necessary, adjust the cuts or joints to ensure the pieces fit smoothly.
Inserting Panels into Rails and Stiles
After you’ve prepared the frame, it’s time to insert the door panels into the grooves or slots you created earlier in the rails and stiles.
- Prepare the Panels: If your design includes panel doors, make sure your panels are cut to the correct thickness and size. Panels should be able to slide into the grooves without being too tight, allowing room for expansion due to humidity changes.
- Insert the Panels: Begin inserting the panels into the grooves of the rails and stiles. If you’re using a panel door design, make sure the panel is placed so that it fits snugly but leaves enough space for expansion. Use a rubber mallet or gentle taps with a hammer (protected by a scrap piece of wood) to ensure the panel fits evenly.
- Fit the Panels Evenly: Once the panel is in place, check to ensure that it sits evenly in the frame. If it shifts or is not aligned, remove it and adjust the groove or panel size as needed.
Checking Alignment and Squareness
Before moving on to the clamping and gluing stages, it’s essential to check that the entire door frame is square and aligned properly.
- Measure for Square: Use a carpenter’s square or a speed square to check the angles of the joints. Ensure that the corners are at a 90-degree angle, both at the top and bottom of the door.
- Diagonal Measurement: Measure the diagonals of the door frame to confirm that they are equal. If the measurements aren’t the same, adjust the frame until the diagonals are equal, ensuring the door is square.
- Final Fit Check: After checking the squareness, check the alignment of the rails, stiles, and panels once more to make sure everything is evenly placed and that the door will function properly once assembled.
Clamping and Drying Time
Once your door frame is square and the panels are inserted, the next step is to clamp the entire assembly to ensure the glue bonds properly.
- Apply Glue: Apply wood glue to the joints where the rails and stiles meet. Be careful not to over-apply glue, as it can spill out and affect the finish later. If you’re using dowels or biscuits, make sure they’re also glued in place.
- Clamp the Door: Use bar clamps or C-clamps to gently apply pressure on the door frame. Start from the center of the door and work outward to evenly distribute the pressure across the entire door. Make sure that the stiles and rails remain flush with each other.
- Check Alignment During Clamping: As you tighten the clamps, double-check the alignment and squareness of the door. Adjust the clamps as needed to ensure the door remains square and the joints are tightly held together.
- Allow to Dry: Let the door dry for at least 1 hour, but for the best results, leave it clamped for at least 24 hours to allow the glue to cure completely. During this time, don’t disturb the door to prevent misalignment or shifting.
DIY Assembly Checklist
- Materials and Tools: Ensure you have all the necessary materials (rails, stiles, panels, glue) and tools (measuring tape, clamps, square) ready before starting the assembly.
- Dry Fit: Always dry-fit your door before applying glue to check for proper alignment and fit.
- Glue Application: Be cautious when applying glue to prevent over-application, which can cause issues with the finish later.
- Check Squareness: Use a square and diagonal measurements to check that the door is square and properly aligned.
- Clamping: Apply even pressure when clamping the door, and adjust as necessary to maintain squareness.
- Allow for Drying Time: Don’t rush the drying process—let the glue fully cure to ensure a strong bond.
By following these steps for assembling your solid wood door, you’ll ensure that the final product is both durable and visually appealing.
Take your time with each step, checking for squareness and proper alignment, and you’ll have a beautifully crafted wooden door to be proud of.
Sanding, Finishing, and Sealing the Door
After spending time crafting your solid wood door, the final steps of sanding, finishing, and sealing wood doors are crucial for protecting the door, enhancing its appearance, and ensuring its longevity.
Proper finishing not only highlights the natural beauty of the wood but also helps prevent issues such as warping or moisture damage.
In this section, we’ll walk you through the key steps to complete the finishing of your solid wood door, including sanding, staining or painting, and applying a protective finish.
Sanding Steps
Sanding is an essential part of sanding a wood door because it smooths the surface and prepares the door for staining or painting. Follow these steps for a smooth, professional finish:
- Start with Coarse Grit: Begin with a coarse sandpaper grit (e.g., 80-grit) to remove any rough spots, glue residue, or imperfections from the wood surface. Sand in the direction of the wood grain to avoid scratches.
- Progress to Finer Grits: Once the surface is smooth, move to a medium grit (e.g., 120-grit) to refine the surface further. Continue sanding, progressing to finer grits (e.g., 220-grit) for a silky-smooth finish.
- Edges and Corners: Pay special attention to the edges and corners of the door. Use a finer grit (e.g., 220-grit) to ensure that these areas are smooth and free from sharp edges.
- Sanding Panels: When sanding the panels of a solid wood door, be careful not to over-sand, as it may alter the fit of the panel within the frame. Sand gently and consistently to maintain the smooth, even surface.
- Dust Removal: After sanding, make sure to remove all the dust using a tack cloth or a damp rag. Dust can affect the finish, so it’s important to clean the surface thoroughly.
Staining and Painting Options
Once the wood is sanded smooth, it’s time to decide on how to finish a solid wood door. Staining or painting can enhance the wood’s natural beauty, add color, and protect the surface.
- Staining: Staining allows the wood’s natural grain to show through while changing its color. There are transparent stains that enhance the wood’s natural beauty, and opaque stains that provide a more uniform, solid color. Popular stains include walnut, oak, or cherry, which are perfect for a rich, natural finish.
- Painting: If you prefer a solid color, painting may be the best option. A painted finish can completely transform the look of your door, offering a modern or traditional aesthetic depending on the color chosen. Choose a high-quality paint designed for wood surfaces, such as oil-based or acrylic paints.
- Color Choices: The color you choose will depend on the look you’re going for. For a natural, classic look, opt for a transparent stain in warm wood tones like mahogany or oak. If you prefer a bold, modern look, consider a solid color or a bold contrast with your room’s design.
Sealing and Weatherproofing
After staining or painting, it’s important to seal the door to protect it from moisture, UV damage, and everyday wear. Sealing wood doors helps to extend the door’s life and maintain its appearance.
- Polyurethane: Polyurethane is one of the most common finishes for wood doors. It provides a durable, glossy finish that is resistant to moisture, scratches, and UV rays. It’s ideal for both interior and exterior doors, providing excellent protection.
- Varnish: Varnish is another popular wood finish that creates a hard, protective layer. It’s a great option for doors exposed to moisture and varying weather conditions, making it a good choice for exterior wood doors.
- Oil Finishes: Oil finishes like tung oil or linseed oil penetrate the wood, providing a natural look that enhances the wood grain. While not as durable as polyurethane or varnish, oil finishes offer a softer, matte finish that’s often used for interior doors. However, they may need periodic reapplication.
Table: Finish Type vs Durability vs Exterior/Interior Use
| Finish Type | Durability | Best Use |
|---|---|---|
| Polyurethane | High – resistant to moisture, scratches, UV | Interior & Exterior Doors |
| Varnish | High – provides hard, protective layer | Exterior Doors, High-moisture Areas |
| Oil Finishes | Medium – natural look, softer finish | Interior Doors, Natural Wood Aesthetic |
| Paint | Medium – requires touch-ups | Interior Doors, Modern Look |
Proper sealing wood doors is a critical step to prevent warping and damage caused by environmental factors, particularly for exterior doors. By choosing the right finish and sealing product, you ensure the longevity and beauty of your door.
In conclusion, finishing a solid wood door not only enhances its appearance but also protects the wood from moisture, UV damage, and wear.
Whether you prefer a natural wood look with stains or a bold finish with paint, the right finish can completely transform your door.
Taking the time to properly sand, stain, and seal the door will ensure that it remains beautiful and durable for years to come.
Installing the Solid Wood Door
Installing a solid wood door is a rewarding process that, when done correctly, will provide long-lasting beauty and functionality to your space.
Proper installation ensures that the door hangs securely, operates smoothly, and aligns perfectly with the door frame.
Whether you’re tackling a door frame installation yourself or hiring a professional, this guide provides step-by-step tips for hanging wood doors with precision and ease.
Preparing the Door Frame
Before you can install a solid wood door, it’s essential to prepare the door frame to ensure a proper fit. A well-prepared frame will prevent issues such as misalignment or gaps when the door is hung.
- Check the Door Frame: Ensure that the door frame is square and level. Use a carpenter’s square and a level to check that the frame’s corners are at a perfect 90-degree angle. If the frame is out of square, you may need to adjust the jambs or shims to align it properly.
- Measure for Door Size: Double-check the measurements of the door and frame. The standard door thickness is around 1 ¾ inches, so make sure the door frame is sized accordingly. It’s always a good idea to leave about 1/8-inch clearance on all sides of the door for proper operation.
- Prepare for Hinge Placement: Mark the spots for the hinges on the door and frame. Typically, the top hinge is placed about 7 inches from the top of the door, and the bottom hinge is about 9 inches from the bottom. The third hinge, if needed, should be placed equidistant between the top and bottom hinges.
Hanging Hinges and Attaching Door
Once your door frame is prepared, the next step is to hang the door and attach the hinges securely.
- Attach Hinges to the Door: Position the hinges on the door, aligning them with the marks you made earlier. Using a chisel and hammer, carefully cut out the recesses in the wood where the hinges will sit. This ensures that the hinges are flush with the surface of the door.
- Mount the Hinges to the Door Frame: With the hinges attached to the door, position the door in the frame. Mark the corresponding spots on the door frame for the hinge placement. Use a screwdriver or drill to attach the hinges to the door frame, securing them with screws.
- Check for Proper Alignment: Before fully tightening the screws, test the door to ensure that it swings smoothly. Adjust the hinge placement if necessary to ensure the door hangs evenly.
Adjusting Clearance and Level
Proper clearance and level adjustments are crucial to ensure the door swings freely and closes securely.
- Check Door Swing: With the door hung, check that it swings open and closed without resistance. The clearance around the door should be consistent. If the door rubs against the frame or floor, you may need to adjust the hinges slightly or shave down the edge of the door.
- Ensure the Door is Level: Use a level to ensure that the door is hanging straight. If the door is tilting in any direction, adjust the hinges or shim the frame to correct the angle.
- Check for Gaps: Ensure there is an even gap between the door and the frame all the way around. If there are any uneven gaps, the door may need to be adjusted or planed for a better fit.
Adding Hardware and Handles
Once the door is properly hung and aligned, the final step is to add the necessary hardware to complete the installation.
- Install the Handle and Lockset: Choose a handle and lockset that complement the style of your door. Mark the spot for the handle at a comfortable height, usually about 36 inches from the floor. Drill holes for the lockset and handle, and attach them according to the manufacturer’s instructions.
- Install the Door Stop: A door stop is typically installed on the door frame to prevent the door from swinging too far. Attach the door stop using screws to the side of the door frame, ensuring it aligns with the door.
- Add Other Hardware: If your door has additional hardware such as a kick plate or decorative hardware, now is the time to attach it. Make sure all screws are tight, and the hardware is securely in place.
Installation Checklist
- Prepare the door frame: Ensure it is square, level, and the correct size for the door.
- Measure for hinge placement: Mark and chisel out spaces for the hinges on both the door and the frame.
- Hang the door: Attach the hinges and secure the door to the frame.
- Adjust clearance: Check the door’s swing and clearance around the edges for an even fit.
- Level the door: Use a level to make sure the door hangs straight.
- Install hardware: Attach the door handle, lockset, and any additional hardware.
- Test the door: Ensure smooth operation and make final adjustments as necessary.
By following these steps, you can install a solid wood door with precision, ensuring it fits securely, swings smoothly, and functions properly.
Whether you are hanging a wood door in a new frame or replacing an old door, careful attention to detail during the installation process will result in a beautifully crafted door that enhances the overall aesthetic and function of your space.
Maintaining and Caring for Your Solid Wood Door
To ensure the longevity and beauty of your solid wood door, regular maintenance is essential. Proper care prevents warping, cracking, and wear, keeping your door looking great for years to come.
In this section, we’ll provide tips on caring for solid wood doors, including cleaning, touch-ups, and seasonal weatherproofing.
Regular Cleaning and Dusting
The first step in solid wood door maintenance is regular cleaning and dusting. Dirt and dust can accumulate on the surface, leading to a dull finish over time.
- Dust Regularly: Use a soft, dry cloth or a microfiber duster to remove dust from the door’s surface. This will help prevent dust buildup and scratches during cleaning.
- Clean with Mild Soap: If the door gets particularly dirty, use a gentle soap diluted in water and a soft cloth to clean the surface. Avoid harsh chemicals, as they can strip the finish.
- Dry Thoroughly: After cleaning, make sure to dry the door with a clean, soft towel to prevent water spots or moisture buildup, which can damage the wood.
Touch-Up Scratches and Stains
Over time, scratches and stains can appear on your door, especially in high-traffic areas. Fortunately, with a little effort, these imperfections can be easily addressed.
- Fill Scratches: For minor scratches, you can use a wood filler that matches the color of your door. Apply it to the scratch, allow it to dry, and then sand it smooth.
- Stain Touch-Ups: If the door is stained and the finish begins to fade or wear off, you can touch up the stain using a small amount of the same color stain. Apply it carefully with a cloth and blend it into the surrounding area.
- Polish the Finish: After filling or staining, polish the door with a wood polish or wax to restore its shine. This will also help to protect the finish and create a protective barrier against future damage.
Weatherproofing and Seasonal Care
Weatherproofing is an essential aspect of solid wood door maintenance, especially for exterior doors. Wood is naturally susceptible to moisture and temperature changes, which can lead to warping or cracking.
- Inspect for Moisture Damage: During seasonal changes, particularly in the winter and summer, check your door for signs of moisture damage. Look for swelling, cracks, or warping in the wood.
- Apply a Protective Finish: For exterior doors, ensure the finish is sealed with a protective layer, such as polyurethane or varnish, that offers weather resistance. Reapply as necessary, especially after exposure to harsh weather conditions.
- Use Door Sweeps and Weatherstripping: For added protection, install door sweeps at the bottom of the door and weatherstripping around the edges. These help prevent drafts and moisture from entering the home, which can cause wood to expand or contract.
Table: Maintenance Task vs Frequency vs Tools Needed
| Maintenance Task | Frequency | Tools Needed |
|---|---|---|
| Regular Cleaning and Dusting | Monthly or as needed | Soft cloth, microfiber duster |
| Touch-Up Scratches and Stains | As needed | Wood filler, matching stain, cloth |
| Weatherproofing and Sealing | Annually, or after harsh weather | Polyurethane, varnish, weatherstripping |
With consistent caring for solid wood doors, you can extend the life of your door and maintain its beauty, protecting it from damage while enhancing its natural look.
Common Mistakes to Avoid When Building a Solid Wood Door
Building a solid wood door can be an incredibly satisfying project, but there are common mistakes that can lead to frustration, delays, and unnecessary costs.
In this section, we’ll highlight DIY door errors to watch out for, saving you time, money, and headaches during the construction process.
Choosing the Wrong Wood
Selecting the wrong wood for your door is one of the biggest mistakes in solid wood door construction. Not all woods are suited for doors—especially when considering durability, weather resistance, and aesthetics.
- Consequence: Using softwoods like pine for exterior doors can lead to quick wear and warping. Similarly, choosing overly expensive hardwoods for an interior door may not provide any additional benefits.
- Fix: For exterior doors, use hardwoods like oak, mahogany, or walnut for durability and weather resistance. For interior doors, softer woods like maple or pine are more than sufficient.
Inaccurate Measurements
Inaccurate measurements are another frequent issue, leading to a door that doesn’t fit properly in its frame or has uneven gaps around the edges.
- Consequence: A poorly fitting door may be hard to hang, won’t close properly, or will have excessive gaps, affecting both aesthetics and energy efficiency.
- Fix: Double-check all your measurements before cutting any pieces. Measure twice, cut once, and always leave a little extra clearance for adjustments.
Improper Joinery
Incorrect wood joinery for doors can result in weak or loose joints, affecting the overall strength and appearance of the door.
- Consequence: Weak joints can cause the door to fall apart or misalign over time, reducing its lifespan.
- Fix: Use strong joinery techniques such as mortise and tenon, dowels, or biscuit joints for a secure and stable structure. Ensure each joint is accurately cut and properly fitted.
Skipping Sanding or Finishing Steps
Many DIY builders skip the sanding or finishing steps, thinking that it’s an unnecessary part of the process.
- Consequence: Without proper sanding, the door may have rough spots, visible tool marks, or an uneven surface. Without finishing, the door will be more prone to scratches, moisture damage, and fading.
- Fix: Always sand the door to a smooth finish and apply a protective finish like polyurethane or stain. This not only enhances the wood’s appearance but also ensures long-lasting durability.
Table: Mistake vs Consequence vs Fix
| Mistake | Consequence | Fix |
|---|---|---|
| Choosing the Wrong Wood | Warping, wear, and unnecessary expense | Choose hardwood for exterior, softwood for interior |
| Inaccurate Measurements | Poor fit, gaps, misalignment | Measure twice, cut once; leave clearance for adjustments |
| Improper Joinery | Weak structure, joints falling apart | Use strong joinery techniques like mortise and tenon |
| Skipping Sanding or Finishing | Rough surface, prone to damage | Sand thoroughly, apply a protective finish |
Avoiding these common solid wood door mistakes will help you build a door that is both functional and aesthetically pleasing.
By taking the time to choose the right materials, measure carefully, use proper joinery, and finish the door properly, you’ll end up with a beautiful, long-lasting door that will add value to your home.
Frequently Asked Questions About Solid Wood Doors
Building and installing a solid wood door is a rewarding and challenging project. Many DIYers and homeowners have questions about the process, the materials, and how to ensure the final result is durable and functional.
Below, we’ve answered some of the most frequently asked questions about solid wood doors to help guide you through the project.
How long does it take to build a solid wood door?
The time it takes to build a solid wood door depends on your skill level, the tools available, and the complexity of the design.
For a simple panel door, the process typically takes between 2 to 3 days, including drying time for glue and finish.
If you’re working on more intricate joinery or an exterior door with extra weatherproofing steps, it may take longer—up to a week for finishing and curing.
Remember, drying time for the glue and the finish is essential, so plan for these extra hours to ensure the best result.
Can I build an exterior solid wood door myself?
Yes, it is entirely possible to build an exterior solid wood door yourself, but it requires careful planning and attention to detail.
Exterior solid wood doors need to be built using strong, weather-resistant wood like oak, mahogany, or walnut. You’ll also need to ensure proper weatherproofing and sealing to protect the wood from moisture, temperature changes, and other environmental factors.
While it’s a more involved process than building an interior door, a DIY enthusiast with the right tools and knowledge can successfully build and install a durable exterior door.
What wood is best for solid wood doors?
The best wood for solid wood doors depends on the intended use—interior or exterior—and the desired aesthetic:
- For exterior doors, hardwoods such as oak, mahogany, cherry, or teak are ideal because of their strength, durability, and resistance to weather and moisture.
- For interior doors, softer woods like pine, maple, and poplar are commonly used. They are easier to work with and more affordable while still providing a beautiful finish.
Each type of wood has its own characteristics, so selecting the right one will impact both the look and longevity of your door.
How do I prevent warping in a solid wood door?
Warping is a common issue in wood doors, especially when exposed to fluctuating temperatures and humidity levels. To prevent warping in a solid wood door:
- Use stable, dry wood: Make sure the wood is well-dried and stored in a climate-controlled environment before building your door.
- Apply a proper finish: Finish both sides of the door with a protective coat like polyurethane or varnish. This helps balance the moisture content and prevents the wood from absorbing or releasing moisture unevenly.
- Install proper weatherstripping: For exterior doors, adding weatherstripping and a door sweep can help minimize exposure to moisture.
How thick should a solid wood door be?
The standard thickness for a solid wood door is typically 1 ¾ inches for both interior and exterior doors. However, you can opt for thicker doors (2 inches or more) if you want additional strength or insulation, especially for exterior doors.
Thicker doors provide better soundproofing, insulation, and security. Always ensure that the thickness of your door is appropriate for the frame you’re working with.
Final Thoughts on Building a Solid Wood Door
Building your own solid wood door is a satisfying and practical project that adds beauty and functionality to your home.
Whether you’re creating an interior or exterior door, the process involves careful planning, the right materials, and attention to detail.
Let’s review some key points to help you build a successful door that will last for years.
Key Takeaways
- Tool Selection Matters: The right tools can make a huge difference in the quality of your work. Ensure you have essential tools like a table saw, router, chisels, and measuring tape for precise cuts and smooth edges.
- Proper Prep Ensures Accurate Cuts: Take your time with measuring and marking to ensure all pieces are cut correctly. Accurate cuts will make assembly easier and result in a door that fits perfectly.
- Wood Choice Affects Durability: Selecting the right wood is critical for the door’s longevity. For exterior doors, opt for hardwoods like oak or mahogany, while softer woods like pine are better for interior doors.
- Joinery and Assembly Determine Strength: Strong joinery methods, such as mortise and tenon, dowels, or biscuits, ensure the strength and stability of your door.
- Sanding, Finishing, and Maintenance Ensure Longevity: A smooth finish, combined with the right sealants and weatherproofing, ensures that your door remains durable and beautiful over time. Regular maintenance will keep it in top shape for many years.
Step vs Tools/Materials vs Tips
| Step | Tools/Materials Needed | Tips |
|---|---|---|
| Measuring and Cutting | Measuring tape, table saw, clamps | Double-check measurements before cutting. |
| Joinery and Assembly | Wood glue, clamps, router, chisels | Use strong joinery methods for durability. |
| Sanding and Finishing | Sandpaper (80, 120, 220 grit), stain, polyurethane | Sand in stages, and apply multiple coats for a smooth finish. |
| Installation | Screws, hinges, drill, level, screwdriver | Ensure door is square and level for proper function. |
| Maintenance | Wood polish, cleaning cloth, weatherstripping | Regular cleaning and sealing prevent damage. |
By following these best practices, you can build a wooden door that not only enhances your home’s aesthetic but also lasts for many years. Take your time with each step, and you’ll create a beautiful, functional door that is sure to impress.