")
Removing wallpaper glue can feel like a daunting task, but it’s essential for ensuring your walls are ready for a fresh coat of paint or new wallpaper. In this guide, we’ll walk you through how to remove wallpaper glue effectively, why it’s important, and the methods you can use to get the job done.
What Is Wallpaper Glue and Why Does It Stick So Hard?
Wallpaper glue is a strong adhesive used to hold wallpaper in place on your walls. Over time, it can bond tightly to the wall surface, making it difficult to remove. The glue is typically made from starch, cellulose, or vinyl-based compounds, which create a strong bond with the wall when they dry. This strong bond is why how to remove wallpaper and glue becomes such a challenge—especially if it’s left to set for long periods.
Why Removing Glue Properly Matters
Removing leftover wallpaper glue is crucial for a few reasons. First, if glue is not properly removed, it can interfere with the adhesion of new paint or wallpaper. Any remaining glue can cause paint to peel or cause texture issues, leading to an uneven surface. Additionally, failing to remove the glue properly could also lead to mold growth or surface deterioration, especially if the wall is made of porous material like drywall or plaster.
Overview of Methods
There are several methods you can use to remove wallpaper glue, each suited for different wall types and levels of adhesive stubbornness. Here’s a brief overview:
- DIY Method: Often the simplest and most cost-effective, DIY methods involve using household ingredients like vinegar, water, or a mixture of both to dissolve the adhesive.
- Chemical Method: Commercial wallpaper adhesive removers can help break down the glue more efficiently, especially in tough areas. These products are formulated to loosen the glue without damaging the wall underneath.
- Steam Method: A steam wallpaper stripper can soften both the wallpaper and the glue, making removal much easier. This is especially useful for walls with heavy adhesive or multiple layers of wallpaper.
Safety and Surface Awareness
When removing wallpaper glue, always keep safety in mind. If you’re using chemicals, be sure to wear protective gloves and goggles to avoid skin irritation or eye injury. If you’re using a steam method, be cautious of hot water and steam burns. Also, make sure your walls are suitable for your chosen removal method. For instance, steam may not be ideal for painted walls, as it can damage the finish.
What This Guide Will Cover
In this guide, we’ll specifically focus on how to remove wallpaper glue from various surfaces like drywall, plaster, and painted walls. Each surface may require a slightly different approach, but with the right tools and techniques, you’ll be able to remove the glue without damaging your walls.
Removing wallpaper glue doesn’t have to be a difficult task—by following this guide, you’ll learn the best methods for your walls, ensuring a smooth surface for your next project.
What Is Wallpaper Glue and Why Is It Hard to Remove?
Wallpaper glue is designed to create a strong bond between wallpaper and the wall surface, but this bond can make removal difficult. Over time, stubborn wallpaper glue can leave behind residue that can interfere with future wall treatments. Understanding the different types of wallpaper adhesives and why they bond so strongly to walls is key to figuring out the best approach for wallpaper adhesive removal.
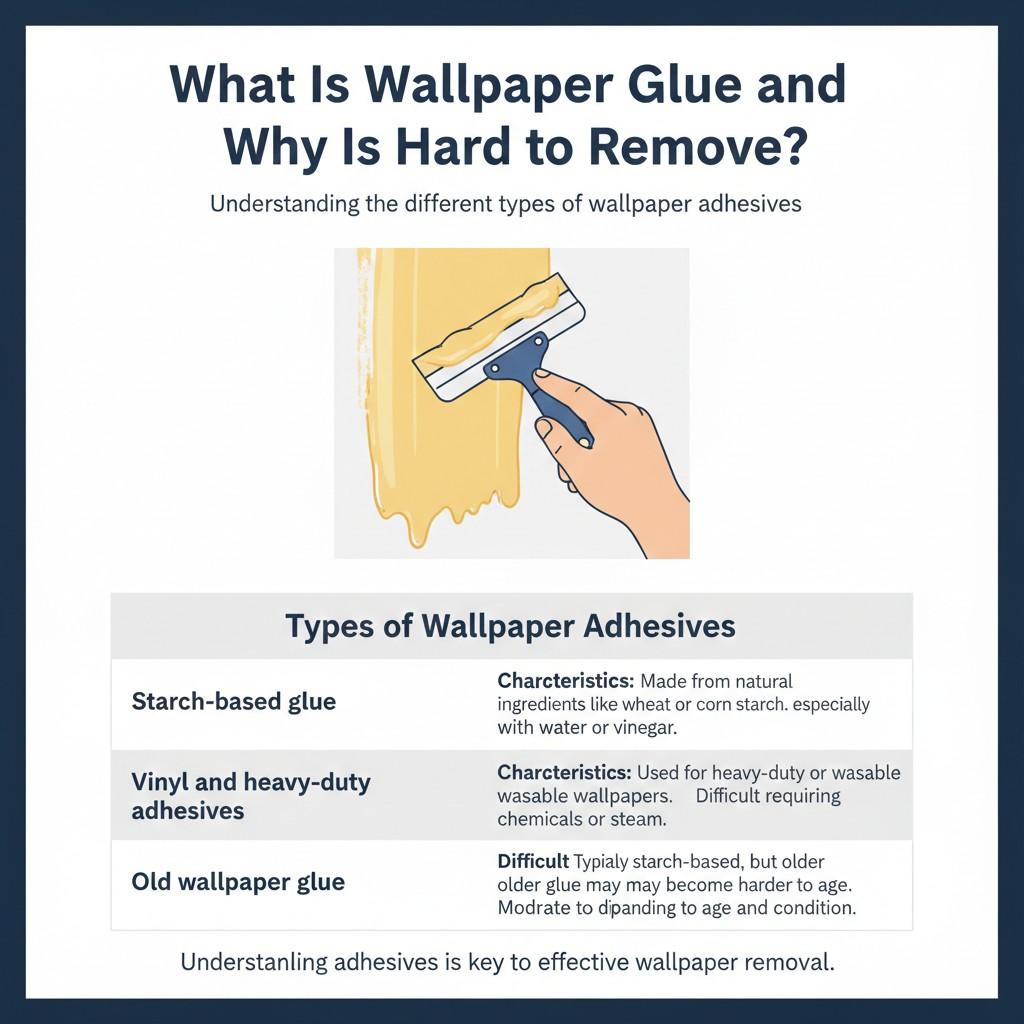
Types of Wallpaper Adhesives
There are several types of wallpaper adhesives, each with its own properties. These adhesives can range from simple, easily removable glues to strong, durable options that are much more difficult to get rid of.
| Adhesive Type | Characteristics | Removal Difficulty |
|---|---|---|
| Starch-based glue | Made from natural ingredients like wheat or corn starch | Easy to remove, especially with water or vinegar |
| Vinyl and heavy-duty adhesives | Used for heavy-duty or washable wallpapers | Difficult to remove, often requiring chemicals or steam |
| Old wallpaper glue | Typically starch-based, but older glue may become harder with age | Moderate to difficult, depending on age and condition |
- Starch-based glue: This type of adhesive is often used for traditional wallpaper and is relatively easy to remove. It’s water-soluble, meaning it can usually be loosened with a mixture of water and vinegar, or even plain water for older glue.
- Vinyl and heavy-duty adhesives: These adhesives are stronger and more resistant to water, which means they are harder to remove. They are commonly used for vinyl wallpaper and other types of wallpaper designed for durability. For wallpaper adhesive removal, stronger methods such as chemical solutions or steam are often required.
- Modern vs old wallpaper glue: Modern adhesives tend to be much stronger than older, starch-based options. Older wallpaper glue can become more difficult to remove with age, as it hardens over time and bonds more firmly to surfaces. In contrast, newer adhesives may be more flexible, allowing them to be loosened more easily.
Why Wallpaper Glue Bonds So Strongly to Walls
Understanding the reasons why wallpaper glue residue can be so persistent is essential for tackling removal. Several factors contribute to how strongly wallpaper glue bonds to walls:
- Porous wall materials: Wall surfaces like drywall and plaster are porous, meaning they can absorb glue, creating a stronger bond between the glue and the wall. Once the glue has been absorbed into the surface, it becomes much more difficult to remove, especially if the glue is old or heavily applied.
- Age and oxidation: As wallpaper glue ages, it oxidizes and hardens. This process makes the glue more resistant to removal. The bond becomes stronger over time, and the glue can become more difficult to loosen. Old wallpaper glue especially benefits from this effect, as the adhesive becomes more entrenched in the material.
- Paint layers over glue: If the walls have been painted over the glue, the paint layer can trap the adhesive, making it even harder to remove. The combination of paint and glue creates a stubborn residue that can require more intensive methods, such as scraping or using commercial adhesive removers, to get rid of.
In conclusion, understanding the wallpaper adhesive removal process starts with recognizing the type of glue used and how it bonds to the wall. Factors like the wall material, the age of the glue, and any paint layers over the glue all contribute to how difficult the removal process will be. By knowing these details, you can choose the most effective method to deal with stubborn wallpaper glue and ensure a smooth, clean surface for your next project.
Tools and Supplies Needed to Remove Wallpaper Glue
Removing wallpaper glue can be a labor-intensive process, but with the right tools and supplies, it becomes much more manageable. This guide will outline the essential tools to remove wallpaper glue, the best cleaning solutions to use, and the safety gear you need to protect yourself and your walls.
Basic Tools for Wallpaper Glue Removal
To begin the process of removing wallpaper glue, you’ll need a few basic tools that help loosen and scrape off the adhesive.
- Wallpaper glue scraper: The wallpaper glue scraper is one of the most important tools for scraping away stubborn glue. This tool typically has a flat, wide blade designed to scrape off glue without damaging the underlying wall. It’s essential for removing larger patches of glue from the surface once the adhesive is softened.
- Utility knife: A sharp utility knife is helpful for cutting through wallpaper layers or any stubborn glue that the scraper can’t reach. Use it carefully to avoid damaging the wall underneath.
- Sponge and bucket: These are needed to apply water or cleaning solutions to soften the glue. A sponge helps distribute the solution evenly across the wall, while a bucket is useful for holding the cleaning mixture.
- Putty knife: For more delicate surfaces, a putty knife can be used to gently loosen glue without scratching or gouging the wall.
Cleaning Solutions and Chemical Removers
After loosening the glue with scraping tools, you’ll need a cleaning solution to dissolve any leftover wallpaper glue residue and make sure the surface is fully clean.
- Best wallpaper glue remover: The best wallpaper glue remover will depend on the type of glue you’re working with. Many DIY solutions, such as a mixture of vinegar and water, work well for starch-based glues, while more stubborn adhesives may require a commercial wallpaper glue remover.
- Commercial wallpaper glue remover: If DIY methods aren’t cutting it, commercial wallpaper glue removers are specifically designed to dissolve tough adhesives. These removers often contain chemicals like citric acid or glycol ether, which can break down glue faster than household products. However, they should be used with caution as they can be harsh on the wall and the surrounding environment.
Safety Gear and Wall Protection
To remove wallpaper glue safely and prevent damage to your walls and yourself, use the following safety gear and precautions:
- Gloves: Wear durable gloves to protect your hands from chemicals, hot water, or any sharp edges from scraping tools.
- Protective eyewear: Protect your eyes from splashes of cleaning solutions, especially if using commercial removers, which can irritate the eyes.
- Drop cloths or plastic sheeting: Lay down drop cloths or plastic sheeting to protect your floors and furniture from any cleaning solutions or debris during the process.
- Wall covers: If using more abrasive tools like scrapers or knives, place protective covering on the adjacent areas to prevent damage to the wall surface.
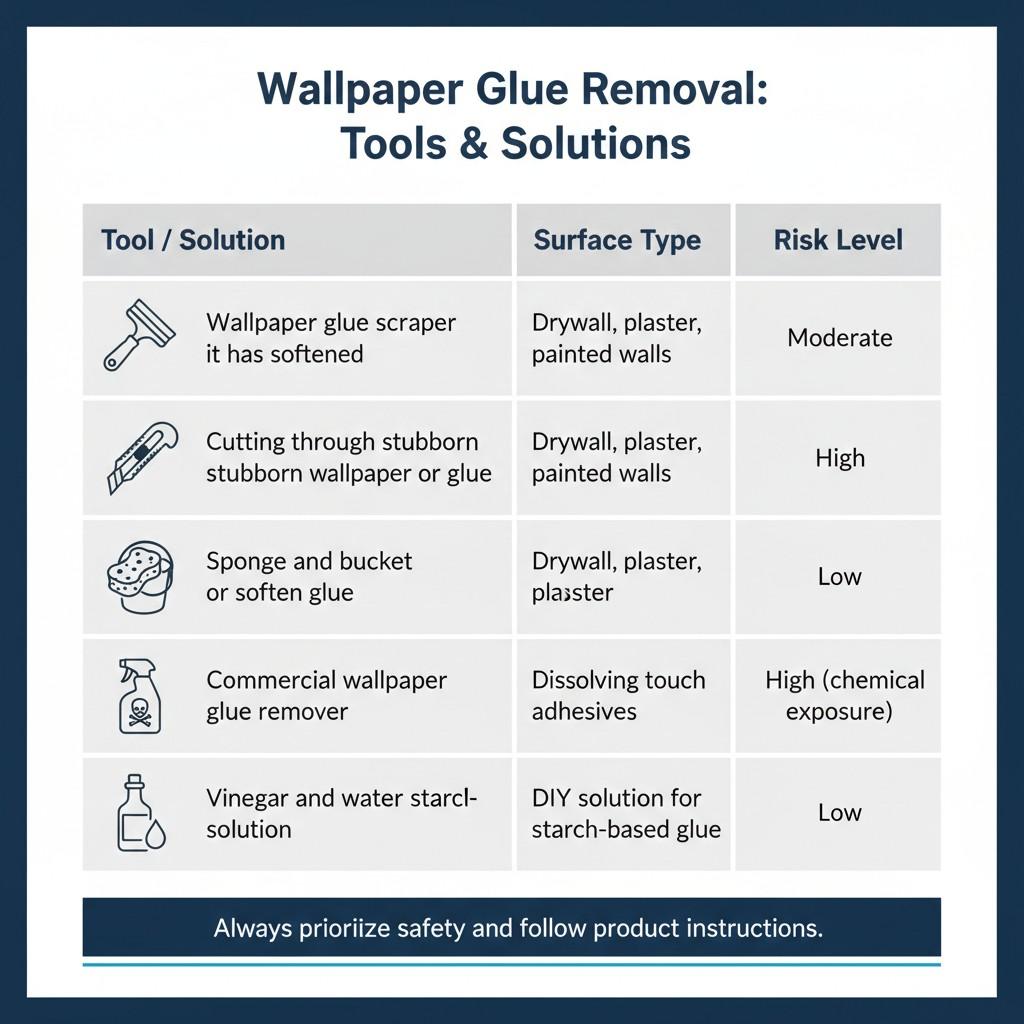
| Tool / Solution | Best Use | Surface Type | Risk Level |
|---|---|---|---|
| Wallpaper glue scraper | Scraping off glue after it has softened | Drywall, plaster, painted walls | Moderate |
| Utility knife | Cutting through stubborn wallpaper or glue | Drywall, plaster | High |
| Sponge and bucket | Applying water or solution to soften glue | Drywall, plaster, painted walls | Low |
| Commercial wallpaper glue remover | Dissolving tough adhesives | Drywall, plaster, painted walls | High (chemical exposure) |
| Vinegar and water solution | DIY solution for starch-based glue | Drywall, plaster, painted walls | Low |
To remove wallpaper glue safely and effectively, having the right tools is essential. A wallpaper glue scraper, utility knife, and cleaning solutions like vinegar or commercial removers are key to tackling the job. Always remember to use proper safety gear and protect your walls from damage. With the right tools and supplies, you can make your wall prep easier and ensure a clean surface for your next project.
How to Remove Wallpaper Glue From Walls (General Method)
Removing wallpaper glue from walls can be a challenging yet rewarding task, especially when preparing for a fresh coat of paint or new wallpaper. This general method breaks down the process into three key steps: softening the glue, scraping without damaging the wall, and cleaning the final residue.
By following these steps, you can remove wallpaper glue from the wall effectively and efficiently.
Softening the Glue
The first step in how to remove wallpaper glue from walls is softening the adhesive. Softening the glue makes the removal process much easier and reduces the risk of damaging the wall surface.
- Water and vinegar solution: Mix equal parts of water and vinegar in a spray bottle. The acetic acid in vinegar helps break down the glue, making it easier to remove. Apply the solution generously to the walls where the glue is present. Allow it to sit for 10–15 minutes to soften the adhesive.
- Steam method: If the glue is particularly stubborn, using a steamer can be an effective way to soften it. Direct the steam onto the glued area, ensuring you don’t over-saturate the wall. Allow the steam to loosen the adhesive before moving on to the next step.
- Commercial glue remover: For heavy-duty adhesive, using a commercial wallpaper glue remover can be a fast solution. These products are formulated to break down tough adhesives more effectively than DIY methods.
Scraping Without Damaging the Wall
Once the wallpaper glue has softened, it’s time to remove it without causing damage to the underlying wall. Removing wallpaper glue without damaging walls requires patience and the right tools.
- Use a wallpaper glue scraper: Start by using a wallpaper glue scraper or a putty knife to gently scrape off the glue. Hold the scraper at a shallow angle to avoid gouging or damaging the surface. Work slowly, scraping in the direction of the grain to avoid leaving marks.
- Be gentle: If you encounter resistance, avoid using excessive force. Instead, apply more water or vinegar solution and let it sit a bit longer to soften the glue further.
- Check for adhesive build-up: Keep an eye on areas that may have thick layers of glue. You may need to repeat the softening process in these spots to ensure a smooth finish.
Cleaning and Final Rinse
Once the majority of the glue has been removed, it’s important to clean off any remaining wallpaper glue residue from walls to ensure your surface is completely free of adhesive.
- Clean the wall: After scraping, wipe the walls with a damp sponge or cloth to remove any leftover glue or cleaning solution. You can also use a mild dish detergent solution or a commercial cleaner for this step. Be sure to rinse thoroughly with clean water to avoid leaving soap or cleaner residue.
- Final rinse: Once the surface is clear of any glue, give the wall a final rinse with clean water to ensure all remnants of the solution are washed off. This is important, especially if you plan to repaint or apply new wallpaper.
Do’s and Don’ts
Do’s:
- Test in a small area: Always test your cleaning solution or steam method on a small, inconspicuous area of the wall first to ensure it doesn’t damage the paint or finish.
- Use soft tools: Use gentle tools like putty knives and plastic scrapers to avoid damaging the wall.
- Repeat if necessary: If glue is still left after the first attempt, don’t hesitate to repeat the softening and scraping process.
Don’ts:
- Don’t rush: Take your time to let the cleaning solution soak in and soften the glue before scraping. Rushing can lead to wall damage.
- Don’t use harsh tools: Avoid using metal scrapers or excessive pressure, as these can scratch or gouge your wall.
When to Repeat the Process
If you encounter particularly stubborn wallpaper glue residue from walls, repeat the softening and scraping process until the wall is completely clear of adhesive. The glue may take a few cycles to loosen, especially if it’s been on the wall for a long time or was applied in thick layers.
By following these steps carefully, you can remove wallpaper glue efficiently, leaving behind a clean and smooth surface that’s ready for your next project. With patience and the right tools, you’ll successfully remove wallpaper glue from walls without causing damage.
How to Remove Wallpaper Glue From Drywall
Removing wallpaper glue from drywall requires careful attention to avoid damaging the delicate surface. Drywall is more susceptible to scratches, gouges, and moisture damage than other materials, so the process should be done with care.
In this guide, we’ll cover the risks of damaging drywall, a safe step-by-step method for glue removal, and how to handle minor drywall damage that may occur during the process.
Risks of Damaging Drywall
Removing wallpaper glue from drywall can be tricky because drywall is a porous material that can easily absorb water or cleaning solutions, leading to potential damage. The most common risks include:
- Moisture damage: If too much water or cleaning solution is applied, the drywall can become soft, swell, or develop mold over time. This is why it’s essential to use moisture sparingly and avoid over-saturating the wall.
- Scratches and gouges: Drywall is more easily scratched or gouged than other wall surfaces. Using the wrong tools or applying too much pressure during scraping can damage the surface, leaving noticeable marks that require repair.
- Tearing the paper layer: Drywall consists of a paper surface that can easily tear if handled improperly. If the glue is too tough or if excessive force is used, you could tear the paper and make the drywall difficult to repair.
Safe Step-by-Step Method
Follow these steps to remove wallpaper glue from drywall without damage:
- Prepare the area: Lay down drop cloths or plastic sheeting on the floor to catch any drips. Remove any furniture or cover it to prevent contact with water or glue.
- Soften the glue: Mix a solution of equal parts water and vinegar or use a store-bought wallpaper glue remover. Spray the solution generously onto the glue-covered area and let it sit for 10–15 minutes. This will help soften the adhesive and make scraping easier.
- Scrape gently: Use a wallpaper glue scraper or a plastic putty knife to gently scrape away the softened glue. Start at the top of the wall and work your way down in small sections. Avoid using metal scrapers, as these can scratch the drywall.
- Wipe the area: After scraping, use a damp sponge or cloth to wipe away any remaining glue residue. Be sure not to oversaturate the wall with water. Gently wipe the surface to remove the residue.
- Repeat if necessary: For stubborn glue spots, reapply the cleaning solution, let it sit, and scrape again. Repeat this process until the wall is completely free of glue.
Repairing Minor Drywall Damage
Even with careful attention, some minor damage to drywall may occur during the wall prep after wallpaper removal. If you notice small gouges, scratches, or indentations, here’s how to repair them:
- Fill gouges and scratches: Use a lightweight spackle or joint compound to fill in any holes or scratches. Apply it with a putty knife, smoothing it flush with the wall surface. Let it dry completely.
- Sand smooth: Once the compound is dry, sand the area with fine-grit sandpaper until it’s smooth and level with the rest of the wall.
- Prime and paint: After sanding, apply a coat of primer to the repaired areas. Once the primer dries, you can repaint the wall to restore the finish.
By following these steps carefully, you can remove wallpaper glue from drywall without causing major damage. With the right tools and techniques, you’ll have a clean, smooth surface ready for your next project.
How to Remove Wallpaper Glue From Plaster Walls
Removing wallpaper glue from plaster walls requires extra care because plaster is a delicate and porous material that can easily be damaged by excess moisture. Removing wallpaper glue from plaster without causing harm to the surface requires patience and the right techniques.
Why Plaster Needs Extra Care
Plaster is different from drywall or other surfaces because it can absorb moisture quickly, which can cause it to soften, crack, or even crumble if not handled properly. How to remove wallpaper glue from plaster walls is a delicate process because using too much water or chemical remover can result in damage. Plaster can also be vulnerable to scrapes or gouges, so extra care must be taken when removing adhesive.
Best Techniques for Plaster Surfaces
Follow these steps to safely remove wallpaper glue from plaster:
- Soften the glue: Start by mixing a water-and-vinegar solution (1:1 ratio) or using a commercial wallpaper glue remover. Apply the solution to the glue-covered areas with a sponge or cloth. Let it sit for 10–15 minutes to loosen the adhesive. Be cautious not to oversaturate the plaster.
- Use a gentle scraper: Use a wallpaper glue scraper or plastic putty knife to gently lift the glue off the plaster. Avoid using metal scrapers, as they can scratch or gouge the surface. Always scrape in the direction of the plaster’s texture to prevent damaging the surface.
- Wipe off residue: After scraping, use a damp cloth to wipe off the remaining glue. Rinse the cloth regularly to prevent spreading glue residue back onto the wall.
- Repeat as needed: For stubborn glue spots, reapply the solution and wait a few more minutes before scraping again. You may need to repeat this process a couple of times for particularly thick adhesive layers.
By following these steps carefully, you can successfully remove wallpaper glue from plaster walls without damaging the material, ensuring a clean surface for the next phase of your project.
How to Remove Wallpaper Glue From Painted Walls
Removing wallpaper glue from painted walls is a more delicate task because the paint layer could be damaged if not handled with care. You need to be cautious to avoid peeling or stripping the paint while removing wallpaper glue from painted wall surfaces.
When Paint Is at Risk
Removing wallpaper glue from painted wall surfaces can be tricky because the glue often bonds to the paint. If you use too much moisture or too harsh a cleaning solution, you could end up peeling the paint or leaving visible water marks. The goal is to dissolve the adhesive without disturbing the paint, so a gentle approach is essential.
- Test the area first: Before applying any solution to the entire wall, test it on a small, inconspicuous area to ensure it doesn’t affect the paint. This helps avoid accidental peeling or discoloration.
- Use a mild solution: Mix a small amount of vinegar and water, or use a store-bought wallpaper adhesive remover designed for use on painted surfaces. Apply the solution using a sponge, avoiding oversaturation.
- Gently scrape: After letting the solution sit for a few minutes, use a plastic scraper to gently lift the glue. Be gentle to avoid scraping off the paint along with the glue. Work slowly to prevent causing damage to the painted surface.
- Clean the surface: Once the glue is removed, wipe the wall with a clean, damp cloth to remove any leftover residue. Dry the wall with a towel or clean cloth.
Removing Wallpaper Border Glue From Painted Walls
If you have a wallpaper border, it may leave behind a different type of adhesive that requires a slightly different approach.
- How to remove wallpaper border glue: Use the same vinegar and water solution or a commercial remover. Apply it carefully around the edges of the wallpaper border and let it sit for a few minutes to soften the adhesive.
- Scrape gently: Using a plastic putty knife or wallpaper glue scraper, gently scrape the glue off the painted wall. Be especially careful around edges where paint may peel easily.
- Clean off residue: After removing the border glue, wipe the wall with a damp cloth to remove any remaining residue. Follow up with a dry cloth to ensure the surface is dry.
By following these methods, you can successfully remove wallpaper border glue from painted walls and clean the surface without risking damage to the paint. A gentle approach ensures that the wall remains intact and ready for your next project.
How to Remove Wallpaper Glue That Was Painted Over
Removing wallpaper glue that was painted over can be a bit tricky, as the adhesive may have bonded to both the wall and the paint. However, with the right techniques, you can effectively break down the glue without damaging the paint or the wall beneath.
Identifying Painted-Over Glue
Before you start, it’s important to identify areas where the glue has been painted over. Wallpaper glue that was painted over often creates a hard, layered surface that is much more challenging to remove than glue on bare walls. You may notice bumps, uneven texture, or peeling paint in certain spots—these could be signs that glue is still present under the paint. Test a small area to see if the glue is still adhesive by lightly scraping with a plastic putty knife.
Best Removal Methods for Painted Glue
- Soften the adhesive: Start by softening the glue. Use a mild vinegar and water solution (1:1 ratio) or a commercial wallpaper adhesive remover to apply to the painted areas. Let it sit for 10-15 minutes, allowing the solution to break down the adhesive and make scraping easier.
- Scraping with care: Once the glue has softened, gently scrape it off using a plastic scraper or putty knife. Be cautious around the painted surface—if too much pressure is applied, it could damage the paint. Work slowly, scraping in small sections, and make sure the adhesive comes off in layers.
- Cleaning the surface: After scraping off the glue, use a damp sponge or cloth to wipe away any residue. You may need to repeat the softening and scraping process for stubborn wallpaper glue that still lingers. Once you’ve removed most of the glue, finish by cleaning the surface with a mild detergent and water to remove any leftover residue.
By following these steps, you can remove wallpaper glue that was painted over without causing damage to the underlying wall or paint, leaving a smooth surface for future treatments.
Removing Wallpaper Glue Using Homemade Solutions
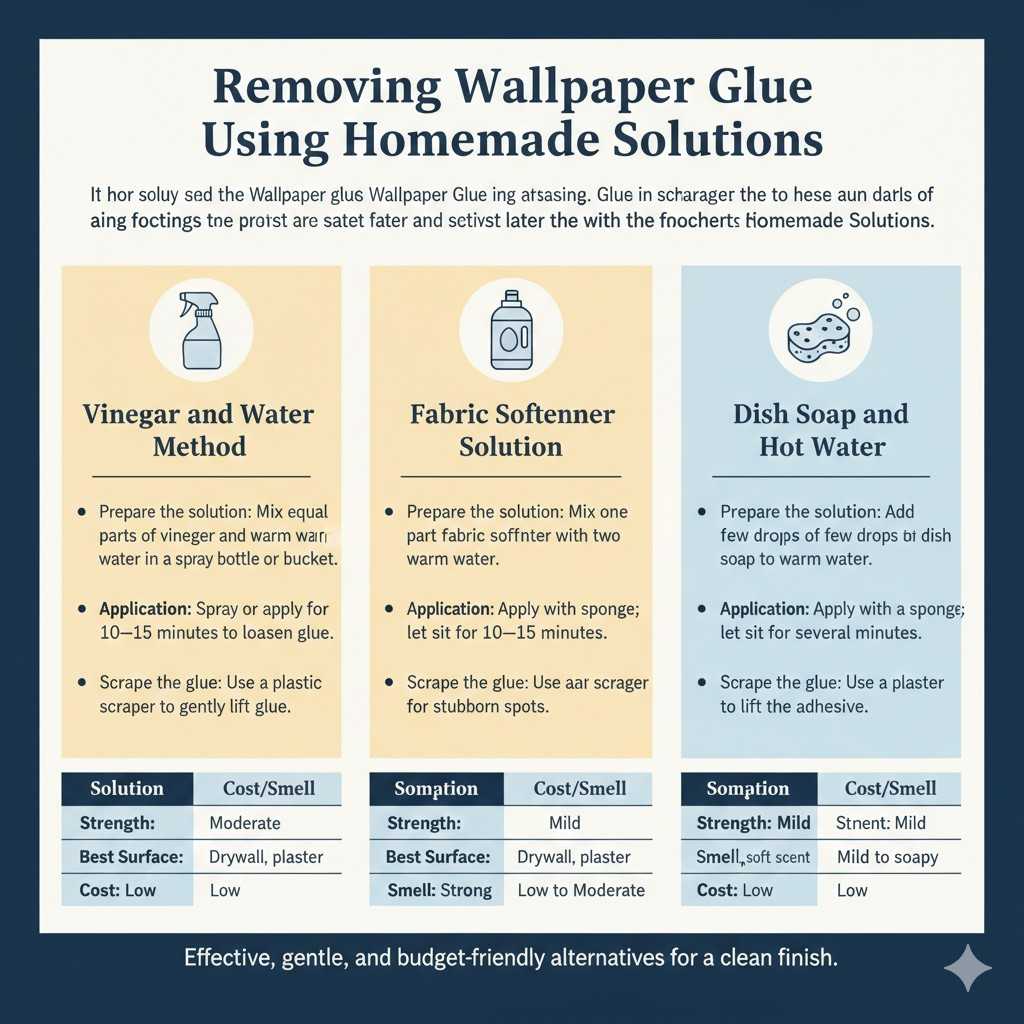
Removing wallpaper glue doesn’t always require harsh chemicals—many homemade solutions can be just as effective. Here are some popular methods for removing wallpaper glue with vinegar, fabric softener, and hot water.
Vinegar and Water Method
One of the most common and effective DIY methods for removing wallpaper glue with vinegar is using a mixture of vinegar and water. This solution is especially useful for starch-based glues.
- Prepare the solution: Mix equal parts of vinegar and warm water in a spray bottle or bucket. Vinegar’s acidity helps break down the adhesive, making it easier to scrape off.
- Application: Spray or apply the solution generously to the glued areas, allowing it to sit for about 10–15 minutes. The longer it sits, the more effective it will be in loosening the glue.
- Scrape the glue: After the solution has had time to work, use a plastic scraper to gently lift the glue off the wall. Repeat the process if necessary, especially for stubborn spots.
Fabric Softener Solution
Another homemade solution involves fabric softener, which is known for its ability to soften adhesives. This method is gentle on walls and highly effective for removing wallpaper glue.
- Prepare the solution: Mix one part fabric softener with two parts warm water. Stir well to ensure the mixture is even.
- Application: Apply the fabric softener solution to the wall using a sponge or spray bottle. Let it sit for 10–15 minutes to give the solution time to loosen the glue.
- Scrape the glue: After the solution has worked, use a plastic scraper to gently remove the softened glue. This method works well for older wallpaper glue that may have become more stubborn over time.
Dish Soap and Hot Water
Dish soap combined with hot water is another effective, gentle solution for removing wallpaper glue with hot water.
- Prepare the solution: Add a few drops of dish soap to a bucket of warm water. Stir until the soap is well mixed, and the water is bubbly.
- Application: Dip a sponge or cloth into the solution and apply it to the glued areas. Let it sit for several minutes to allow the soapy water to break down the glue.
- Scrape the glue: Use a plastic scraper to remove the softened glue. The soap helps to lift the adhesive without damaging the wall surface.
| Solution | Strength | Best Surface | Smell | Cost |
|---|---|---|---|---|
| Vinegar and Water | Moderate | Drywall, plaster, painted walls | Strong, but dissipates | Low |
| Fabric Softener Solution | Mild | Drywall, plaster, painted walls | Pleasant, soft scent | Low to Moderate |
| Dish Soap and Hot Water | Mild | Drywall, plaster, painted walls | Mild, soapy | Low |
These homemade solutions are an excellent choice for removing wallpaper glue without using harsh chemicals. Whether you choose vinegar, fabric softener, or dish soap, these methods are cost-effective and gentle on surfaces. With a little time and patience, you can effectively remove wallpaper glue and prepare your walls for the next phase of your project.
See also How Much Does Drywall Repair Cost
Using Steamers and Commercial Products
Removing wallpaper glue can be a challenging task, but with the right tools, it becomes much easier. Two of the most effective methods are using steamers and commercial products designed for wallpaper glue removal.
Wallpaper Steamers
One of the most efficient ways to remove wallpaper glue with a steamer is by using a wallpaper steamer. Steamers use hot steam to soften the adhesive, making it much easier to scrape off. This method is especially effective for stubborn wallpaper glue that resists DIY methods like vinegar or water.
- How it works: A wallpaper steamer works by applying high-temperature steam to the surface, which penetrates the wallpaper and glue. The heat loosens the adhesive, allowing you to scrape it away without excessive moisture or harsh chemicals.
- Benefits: The steam method is ideal for thicker or more stubborn wallpaper glues. It’s also a cleaner method compared to using liquids that could soak into the walls. Steamers are great for larger areas and can speed up the process significantly.
- Considerations: When using a steamer, be sure to move the steamer over a small section at a time, as applying too much steam to one area can damage the wall. Also, always use the steamer according to the manufacturer’s instructions to avoid burns or water damage.
Commercial Wallpaper Glue Removers
For particularly tough adhesive, best wallpaper glue remover products are a great option. These commercial products are specifically formulated to dissolve wallpaper glue effectively.
- How it works: These removers often contain ingredients like glycol ether, which help break down the glue and make it easier to scrape off. The best wallpaper glue remover products are designed to be safe on most surfaces, though it’s still important to test the product in a small, hidden area before using it on the entire wall.
- Benefits: Commercial removers are fast-acting and effective for stubborn or older wallpaper glue. They’re available in both liquid and gel forms, depending on your needs. They save time and effort compared to homemade solutions.
- Considerations: While commercial products are effective, some may contain harsh chemicals. Be sure to follow safety instructions, including wearing gloves and using proper ventilation.
How to Remove Wallpaper Glue Before Painting
Removing wallpaper glue before painting is crucial to ensuring a smooth and durable paint finish. Any leftover adhesive can interfere with the paint’s ability to adhere to the wall, leading to peeling, uneven texture, or blotches.
Why Glue Must Be Removed Before Painting
Wallpaper glue needs to be completely removed before painting for several reasons. First, any residual glue can prevent the paint from bonding properly, which leads to peeling or cracking. Second, glue left on the wall can create an uneven surface, affecting the final appearance of the paint job. Lastly, old adhesive can affect the texture of the paint, leading to visible patches or an inconsistent finish.
Wall Prep for a Smooth Paint Finish
Once you’ve removed all the wallpaper glue, preparing walls after removing wallpaper is essential to ensure a smooth paint job. Here are the key steps to follow:
- Check for imperfections: After removing the wallpaper glue, inspect the wall for any small holes, scratches, or gouges. Use a joint compound or spackle to fill any imperfections. Once dry, sand the area smooth.
- Clean the wall: After filling holes and sanding, clean the wall to remove any dust or leftover glue residue. A mild detergent and water solution can help remove any remaining sticky spots.
- Prime the wall: Apply a coat of primer to the wall. Primer helps to seal the surface and ensures that the paint adheres properly, especially if the wall is porous or uneven.
| Step | Required | Optional | Notes |
|---|---|---|---|
| Remove wallpaper glue | Yes | Thoroughly remove all adhesive | |
| Fill holes or scratches | Yes | Use joint compound or spackle | |
| Clean wall | Yes | Remove dust and adhesive | |
| Apply primer | Yes | Essential for paint adhesion |
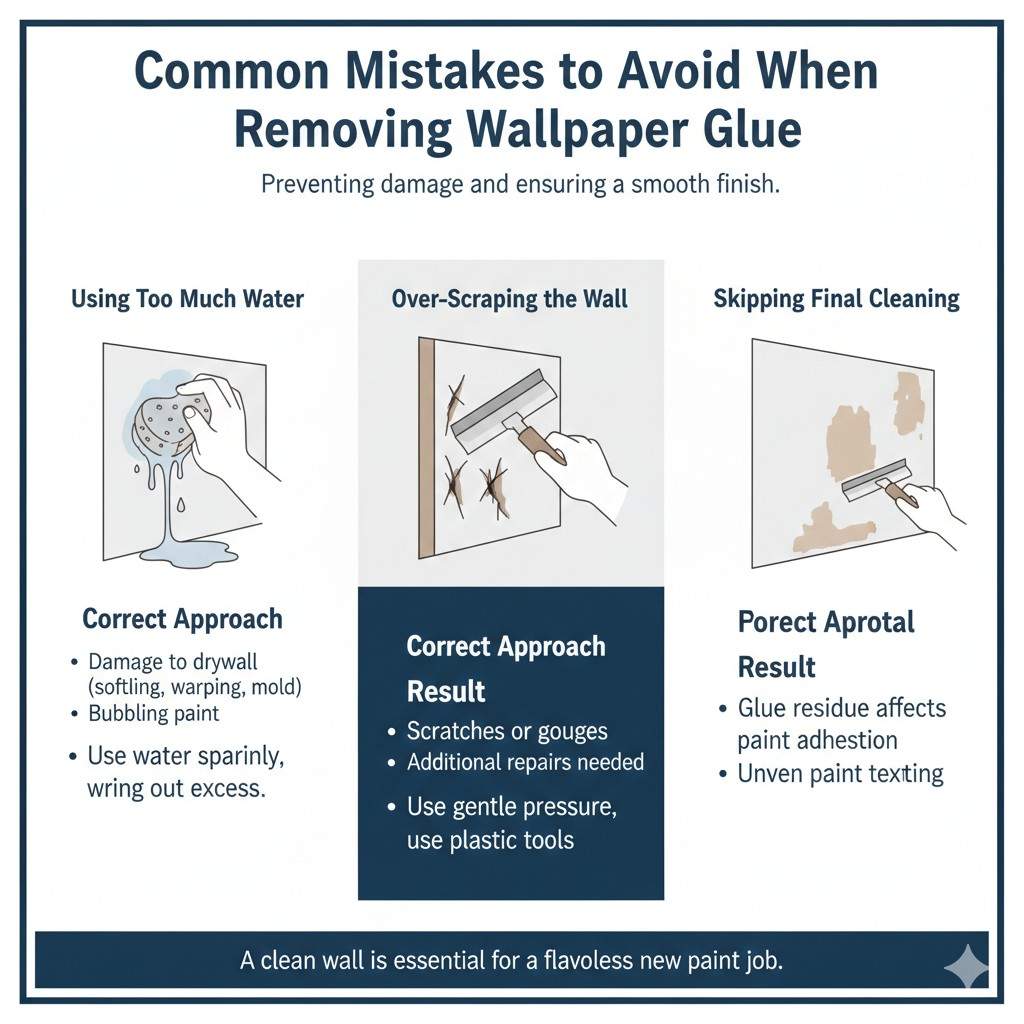
Common Mistakes to Avoid When Removing Wallpaper Glue
When removing wallpaper glue, it’s easy to make mistakes that can delay the process or damage your walls. Here are the most common mistakes and how to avoid them.
Using Too Much Water
Excessive moisture can cause drywall or plaster to absorb water, leading to softening, warping, or mold growth.
Mistake: Over-wetting the wall with water or cleaning solutions.
Result: Damage to the wall surface, including bubbling paint, softened drywall, and mold.
Correct Approach: Use water or cleaning solutions sparingly and ensure the wall doesn’t become saturated. Always wring out excess liquid from your sponge or cloth.
Over-Scraping the Wall
Scraping too hard or using metal tools can gouge or scratch the wall surface, especially on drywall.
Mistake: Scraping too aggressively or with improper tools.
Result: Visible scratches or gouges, leading to additional repairs.
Correct Approach: Use plastic scrapers or putty knives, and avoid applying too much force. If resistance is encountered, reapply the softening solution and wait longer.
Skipping Final Cleaning
Not cleaning the wall properly after removing the glue can leave residue, which affects paint adhesion and texture.
Mistake: Skipping the final cleaning step or not rinsing the wall thoroughly.
Result: Glue residue or leftover cleaning solution can cause the new paint to peel or look uneven.
Correct Approach: Clean the wall thoroughly after removing the glue to ensure it’s free from residue. Use clean water and allow the wall to dry before priming.
| Mistake | Result | Correct Approach |
|---|---|---|
| Using too much water | Softening or warping of drywall | Use water sparingly and wring out excess liquid |
| Over-scraping the wall | Scratches or gouges in the surface | Use gentle pressure with plastic tools |
| Skipping final cleaning | Glue residue affects paint adhesion | Clean thoroughly and let the wall dry before painting |
How Long Does It Take to Remove Wallpaper Glue?
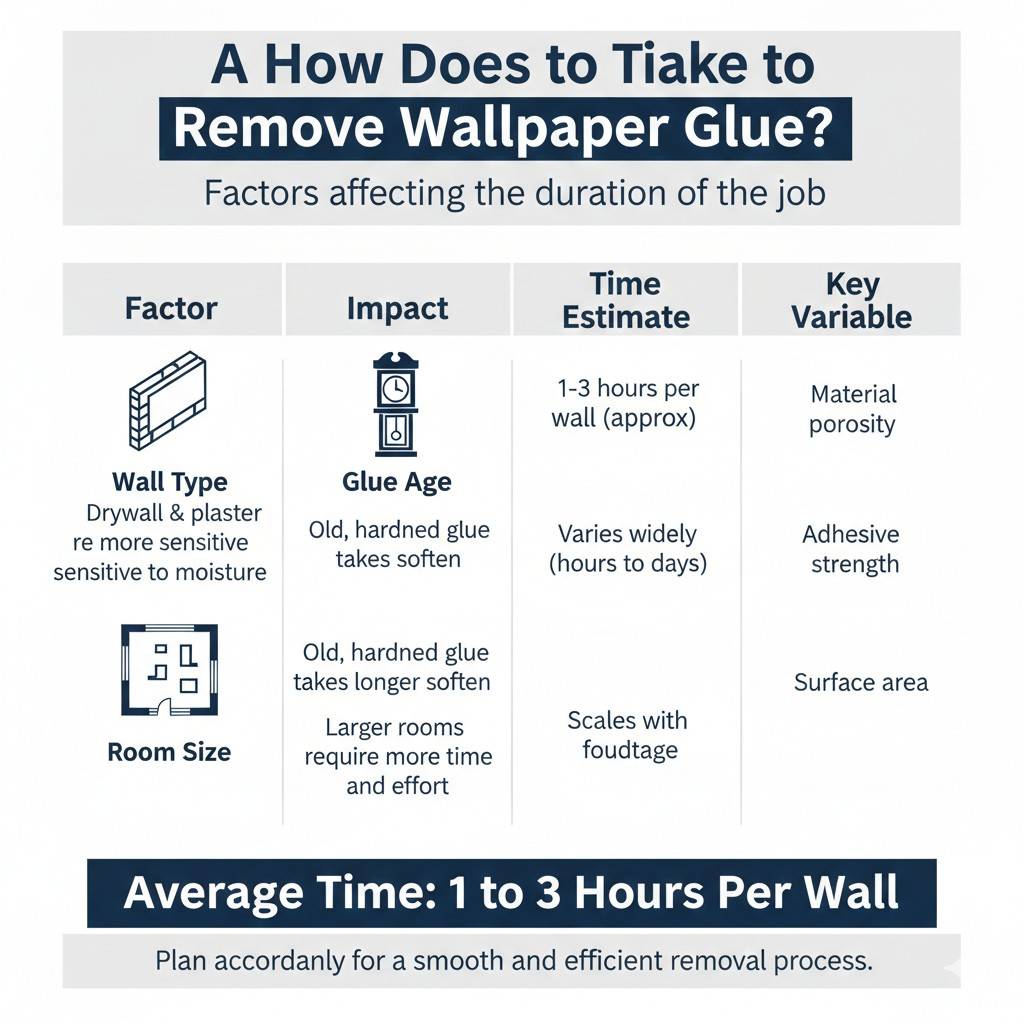
The time it takes to remove wallpaper glue depends on several factors, including the wall type, the age of the glue, and the room size.
Wall Type
Drywall and plaster are more sensitive to moisture, requiring careful application of water or cleaning solutions, which can increase the time needed. Painted walls may also require gentler techniques to avoid damaging the paint.
Glue Age
How long does it take to remove wallpaper glue can vary depending on the age of the glue. Old, hardened glue takes longer to soften and may require repeated applications of water, vinegar, or commercial removers.
Room Size
Larger rooms or walls with multiple layers of wallpaper will naturally take longer to clear. The complexity of the task increases with the amount of glue and the need for more thorough cleaning or scraping.
In general, it could take anywhere from 1 to 3 hours per wall, depending on the above factors.
By understanding these variables, you can plan your time accordingly and ensure the glue removal process goes as smoothly as possible.
Frequently Asked Questions About Removing Wallpaper Glue
Removing wallpaper glue can be tricky, but understanding the process and knowing the best methods can make a world of difference. Here are some common questions and answers to help guide you through the process of removing wallpaper glue.
What Removes Wallpaper Glue Best?
The best wallpaper glue remover depends on the type of adhesive used and the surface you’re working with. Here are a few common methods:
- Vinegar and water: A 1:1 mixture of water and vinegar is great for removing stubborn wallpaper glue. It works particularly well for starch-based adhesives.
- Commercial wallpaper glue remover: These are specifically designed to break down tough adhesives and often contain stronger ingredients than DIY solutions. They’re excellent for older or more stubborn wallpaper glue.
- Steamers: A steam wallpaper stripper can soften glue effectively, making it easier to scrape off. This method is especially useful for stubborn glue and larger areas.
Can You Paint Over Wallpaper Glue?
It’s not recommended to paint over wallpaper glue. Leftover glue can interfere with the paint’s ability to bond to the wall, causing peeling, uneven texture, or blotches. To achieve a smooth, durable paint finish, it’s essential to remove leftover wallpaper glue completely before painting. Use scraping, washing, and cleaning methods to ensure the glue is gone, then prime the surface for painting.
Does Vinegar Really Remove Wallpaper Glue?
Yes, vinegar is an effective natural solution for removing wallpaper glue. The acidity in vinegar helps to break down the adhesive, especially for starch-based glues, and it’s gentle on most wall surfaces. It’s a non-toxic option that works well for mild to moderate glue residues. However, for stubborn glue, stronger chemical removers or a steamer might be needed.
Why Is Wallpaper Glue So Hard to Remove?
Wallpaper glue bonds strongly to walls, which makes it challenging to remove. Several factors contribute to this:
- Types of glue: Modern adhesives like vinyl or heavy-duty wallpaper glue create a more permanent bond, making them harder to remove.
- Porous walls: Surfaces like drywall and plaster absorb the glue, further strengthening the bond. The glue may also bond to the paint layer if it’s been painted over.
- Age of glue: Older glue can become more stubborn over time, hardening and bonding more securely to the wall.
Do I Need to Sand After Removing Wallpaper Glue?
Yes, sanding after removing wallpaper glue is often necessary to ensure a smooth surface for painting or re-wallpapering. Once the glue is removed, the wall may have patches of residue or uneven areas that need to be sanded down. Use fine-grit sandpaper to smooth the surface gently. This step ensures that the new paint or wallpaper adheres properly and results in a clean, smooth finish.
Final Thoughts on How to Remove Wallpaper Glue
Removing wallpaper glue can be a time-consuming task, but with the right approach, it doesn’t have to be difficult. By choosing the appropriate method for your wall type and adhesive, and exercising patience, you can achieve a clean, smooth surface for your next project.
Key Takeaways
- Matching method to surface: Different surfaces and types of wallpaper glue require different removal methods. Be sure to use the right approach for drywall, plaster, or painted walls.
- Patience over force: It’s important to take your time and let solutions like vinegar, water, or commercial removers work. Rushing can cause damage to your walls.
- Prep determines final results: Proper prep work, including removing all glue, sanding, and priming, is crucial to ensuring that your paint or new wallpaper adheres properly and looks professional.
| Surface | Best Method | Avoid | Prep Needed |
|---|---|---|---|
| Drywall | Vinegar solution, steamer | Harsh chemicals or excessive moisture | Sand lightly, prime if necessary |
| Plaster | Vinegar solution, commercial remover | Excessive water | Use minimal moisture, prime if needed |
| Painted Walls | Mild cleaner, steam | Over-wetting or aggressive scraping | Test solution first, light sanding |
By following these guidelines, you can successfully remove wallpaper glue and prepare your walls for the next phase of your project. Whether you’re painting or applying new wallpaper, taking the time to prep your walls properly will ensure a smooth, professional finish.
See also Which of These Is Known as the Greatest Danger Associated With Excavations?