

When installing a metal roof, the placement of screws is a crucial aspect of ensuring its longevity, performance, and overall durability. Proper screw placement can help prevent common issues such as leaks, rust, and structural damage. In this guide, we’ll explore why the correct screw placement is essential, the various types of metal roofing, and the most common mistakes to avoid when cutting and screwing metal roofing materials.
Why Proper Screw Placement Matters
One of the primary reasons for paying attention to where you screw metal roofing is to enhance the durability and life expectancy of the roof. When screws are placed correctly, they help secure the metal panels to the roof structure, preventing them from shifting or loosening over time. Proper placement also contributes to the roof’s resistance to wind, heavy rain, and snow.
Additionally, correct screw placement is vital for leak prevention. Screws that penetrate too deeply or in the wrong spots can create gaps or holes in the panels, allowing water to seep through. This can lead to water damage, mold growth, and compromised insulation, which are expensive to repair. Therefore, knowing the best screw placement for metal roofing is essential to keep your home or building safe and dry.
Another consideration is the expansion and contraction of metal. As temperatures fluctuate, metal roofing materials expand and contract. Screws placed too tightly or at improper angles can restrict this natural movement, causing the metal to buckle, warp, or even crack over time. Using the correct screw placement allows the roofing material to expand and contract without stress, ensuring better overall performance.
Overview of Different Metal Roof Types
Understanding where to screw metal roofing begins with identifying the type of roof you’re working with. There are several common types of metal roofing, each requiring different screw placement and fasteners:
- Corrugated Metal Roofing: This type has wavy or ridged panels and is often used for agricultural or industrial buildings. The screws should go into the ridges to ensure a secure hold and minimize the risk of leaks.
- Standing Seam Metal Roofing: This roofing style features vertical seams that lock together. Screws for this type should be placed in the seam’s clamping areas, allowing for the natural expansion and contraction of the panels.
- Aluminum Roofing: Lightweight and corrosion-resistant, aluminum roofing requires screws to be placed in the valleys or ribs, depending on the profile. This placement ensures that the fasteners won’t compromise the roof’s waterproof nature.
- Steel Roofing: Like aluminum, steel roofing can come in various profiles, but steel panels generally require screws to be placed in the troughs or ribs for optimal support and to avoid damaging the metal.
Common Mistakes When Screwing Metal Roofing
One of the most frequent mistakes when installing metal roofing is improper screw placement. A common error is using too many screws or placing them in the wrong areas, which can lead to weakened structural integrity. Another mistake is using screws that are not suitable for the material, causing rust and corrosion. It’s also essential to avoid overtightening screws, as this can crush the panels or strip the threads.
Now that we’ve covered the importance of screw placement, let’s dive into a quick comparison of metal roofing types and their corresponding screw placement recommendations.
| Metal Roof Type | Recommended Screw Location | Typical Fastener |
|---|---|---|
| Corrugated Metal | In the ridges of the panel | Self-drilling screws |
| Standing Seam | In the clamping areas of the seam | Metal clips and screws |
| Aluminum Roofing | In the valleys or ribs | Stainless steel screws |
| Steel Roofing | In the troughs or ribs | Galvanized screws |
By understanding where to screw metal roofing based on the type of material you’re working with, you can avoid these mistakes and ensure a roof that will last for years to come.
Tools and Hardware Needed for Metal Roofing Screws
When installing metal roofing, choosing the right tools to screw metal roofing is essential for a secure, efficient, and safe installation. Whether you’re a professional roofer or a DIY enthusiast, understanding the best tools and screws for metal roofing and the different types of screws required for various applications will make the process smoother and ensure long-term durability. In this section, we’ll explore the best tools to screw metal roofing, the different types of metal roofing screws, and how to safely use them for optimal results.
Hand Tools
Screwdrivers and Manual Screw Guns
For smaller roofing projects or when working in tight spaces, manual screwdrivers or manual screw guns can be handy tools. These hand tools are used to drive metal roofing screws into the roofing panels. While they don’t require any electrical power, they can be more time-consuming and physically demanding than power tools.
When to Use:
Manual screwdrivers or screw guns are useful for detailed work or areas with limited access. They’re best suited for projects with fewer screws to fasten, where precision is essential. They can also be used for fastening screws in locations where power tools can’t reach.
Pros:
- Affordable and easy to use.
- No need for electricity or batteries.
- More control over screw placement and torque.
Cons:
- Time-consuming for large projects.
- Requires more effort and physical strength.
Safety Tips:
- Ensure the screwdriver or screw gun has a comfortable grip to prevent slipping.
- Always wear gloves to protect your hands from injury.
- Be cautious of slipping screws that may damage the metal surface.
Power Tools
Cordless Drill, Impact Driver, and Screw Guns
For larger projects, power tools like cordless drills, impact drivers, and screw guns for metal roofing are highly recommended. These tools make the job faster and more efficient, especially when installing large sheets of metal roofing. They help drive metal roofing screws quickly and with consistent torque, preventing the risk of over-tightening or damaging the panels.
Cordless Drill:
A versatile tool, ideal for drilling pilot holes and driving screws. When paired with the correct bit, it can make quick work of fastening metal roofing screws.
Impact Driver:
Perfect for driving self-drilling screws for metal roofing into tougher materials like steel. The impact driver delivers a burst of torque, making it easier to install screws without damaging the roofing material.
Screw Gun:
Specifically designed for driving screws into metal, a screw gun provides a consistent depth setting, reducing the chances of overdriving or underdriving screws.
Best Bits for Metal Roofing Screws:
When using a cordless drill or impact driver, it’s crucial to select the right bit. Hex driver bits and Torx bits are most commonly used for metal roofing screws, providing a secure grip and reducing the chances of stripping the screws.
Pros:
- Faster installation, ideal for large roofing projects.
- More consistent screw placement and torque control.
- Reduced physical effort compared to hand tools.
Cons:
- Higher upfront cost.
- Requires batteries or electricity.
- More maintenance than hand tools.
Safety Tips:
- Always wear safety goggles to protect your eyes from flying debris.
- Make sure the drill or driver is set to the correct torque to prevent overdriving screws.
- Check battery levels before starting large projects to avoid interruptions.
Screw Types and Fasteners
Self-Drilling Screws, Deck Screws, Neoprene Washer Screws
The type of screw you use is just as important as the tools. The right screws for metal roofing ensure a secure connection between the panels and the roof structure, while improper screws can lead to leaks, rust, or weak spots.
- Self-Drilling Screws for Metal Roofing:
These screws have a built-in drill bit at the tip, allowing them to penetrate metal without the need for a pilot hole. They’re the best choice for quick and efficient installations, especially when working with thicker metals. - Deck Screws:
Used for fastening panels to the roof frame, deck screws are often used with wood or other structural materials. They provide a strong hold but may not be as efficient in penetrating thick metal without a pilot hole. - Neoprene Washer Screws:
These screws come with a rubber washer that helps create a waterproof seal around the screw, preventing leaks. They are typically used for corrugated metal roofing.
Choosing the Right Size and Type for Corrugated vs. Standing Seam Panels:
- Corrugated Panels: Use self-drilling screws for metal roofing with neoprene washers to ensure a watertight seal.
- Standing Seam Panels: Use screws designed for standing seam profiles, which may be clipped to the seams and require different screw placements.
Tool vs. Screw Type vs. Metal Thickness vs. Speed/Precision
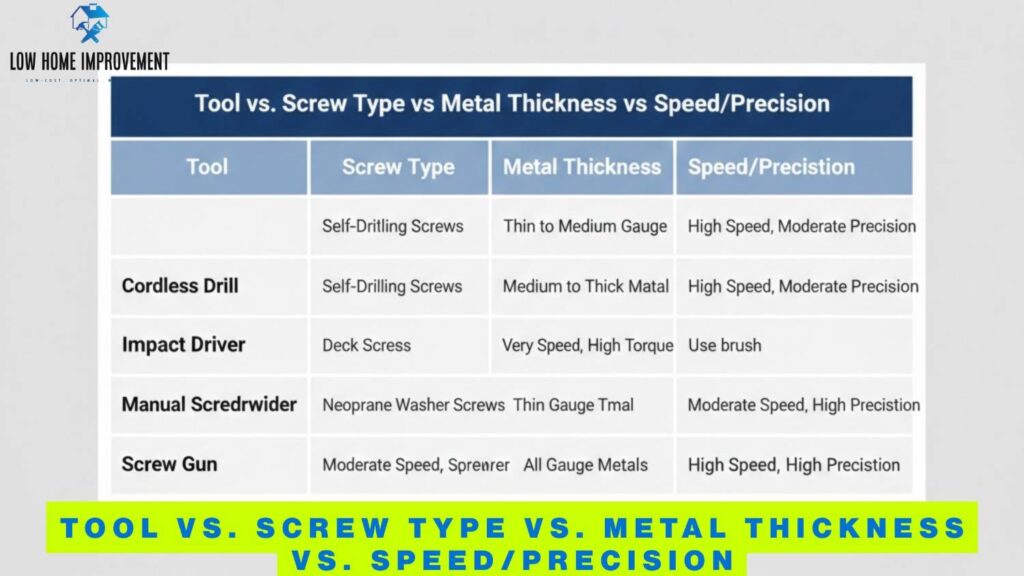
| Tool | Screw Type | Metal Thickness | Speed/Precision |
|---|---|---|---|
| Cordless Drill | Self-Drilling Screws | Thin to Medium Gauge Metal | High Speed, Moderate Precision |
| Impact Driver | Deck Screws | Medium to Thick Gauge Metal | High Speed, High Torque |
| Manual Screwdriver | Neoprene Washer Screws | Thin Gauge Metal | Moderate Speed, High Precision |
| Screw Gun | Self-Drilling Screws | All Gauge Metals | High Speed, High Precision |
By choosing the correct tools to screw metal roofing and the appropriate metal roofing screws, you can ensure that your roofing project is efficient, secure, and long-lasting. Always be mindful of the type of roof you’re installing and select the right tools and fasteners for the job.
Preparing the Metal Roof Before Screwing
Before diving into the task of cutting and screwing metal roofing, it’s important to take the necessary steps to properly prepare the roof and the panels. Proper preparation not only ensures a cleaner, more efficient installation but also helps prevent costly mistakes down the line. In this section, we will guide you through key steps for preparing metal roofing, including measuring and marking screw locations, surface preparation, and the necessary safety gear.
Measuring and Marking Screw Locations
Properly measuring and marking where to screw the metal roofing is essential for achieving a secure and long-lasting installation. Without precise measurements, you risk uneven screw placement, which can lead to gaps, leaks, and structural instability. Here’s how to get it right:
Tips for Straight, Evenly Spaced Lines:
- Begin by determining the appropriate spacing between screws, which typically ranges from 12 to 24 inches, depending on your roof’s pitch and the type of metal roofing you’re using.
- Use a tape measure to mark consistent intervals along the edge of the roofing panels, ensuring that the screws will be evenly spaced.
- To ensure straight lines, avoid measuring with freehand. Use a chalk line or layout template to snap a straight line across the panel. This will act as a guide for placing screws.
Using Chalk Lines, Tape Measures, and Layout Templates:
- A chalk line is essential for snapping long, straight lines across the roofing material, helping you maintain alignment.
- Tape measures ensure the correct distance between screw points, ensuring uniformity across the roof.
- If you’re installing multiple panels, a layout template can speed up the process and help you align screw holes quickly and accurately.
Surface Preparation
Before securing the roofing panels with screws, you need to prepare the surface to ensure a clean and stable foundation for installation. Taking the time to clean and inspect the surface will help prevent future issues like rust, corrosion, and poor adhesion.
Cleaning Debris, Oil, and Rust:
- Debris: Remove any dirt, dust, or loose particles from the roofing panels. This will ensure a clean surface for screws to grip and prevent debris from getting trapped under the panels.
- Oil: Wipe away any oil or grease residue, which can interfere with the metal’s ability to seal properly around the screws.
- Rust: Inspect the panels for any rust spots. If rust is present, it should be sanded off or treated before installation to prevent it from spreading.
Checking for Bent or Warped Panels:
- Carefully inspect each metal panel before installation. Panels that are bent, warped, or damaged may not align properly and can lead to uneven screw placement, resulting in leaks or other structural issues. It’s important to replace or straighten these panels before proceeding with installation.
Safety Gear and Setup
Safety should always be your top priority when working with metal roofing. The preparation process involves physical labor, cutting, and moving heavy materials, so wearing the appropriate Personal Protective Equipment (PPE) is crucial.
PPE: Gloves, Goggles, Hearing Protection, Kneepads:
- Gloves: Protect your hands from sharp edges, metal burrs, and cuts when handling roofing panels.
- Goggles: Wear safety goggles to shield your eyes from flying debris during cutting or screwing.
- Hearing Protection: If you’re using power tools like drills or screw guns, ear protection is essential to guard against hearing damage.
- Kneepads: When working on a sloped roof, kneepads provide comfort and protection for your knees during extended periods of installation.
Securing Panels to Prevent Slipping:
- Ensure the metal roofing panels are secured in place to prevent them from slipping during the installation process. This can be done by using temporary fasteners or clips, especially when working on a steep pitch. This step helps to keep the panels aligned while you work and prevents accidents.
Pre-Screwing Checklist
Before you start screwing the metal roofing panels into place, double-check the following:
- Measuring: Ensure all screw locations are marked evenly and accurately.
- Leveling: Confirm that the roof panels are properly aligned and level before screwing them in.
- Safety: Double-check that all necessary PPE is worn, and that the work area is clear of debris.
- Panel Alignment: Ensure the panels are correctly positioned, aligned, and securely fastened to prevent any shifting during installation.
Taking these preparation steps will not only make the installation process more efficient but will also result in a safer, more durable roof that will stand the test of time.
How to Screw Metal Roofing Panels Properly
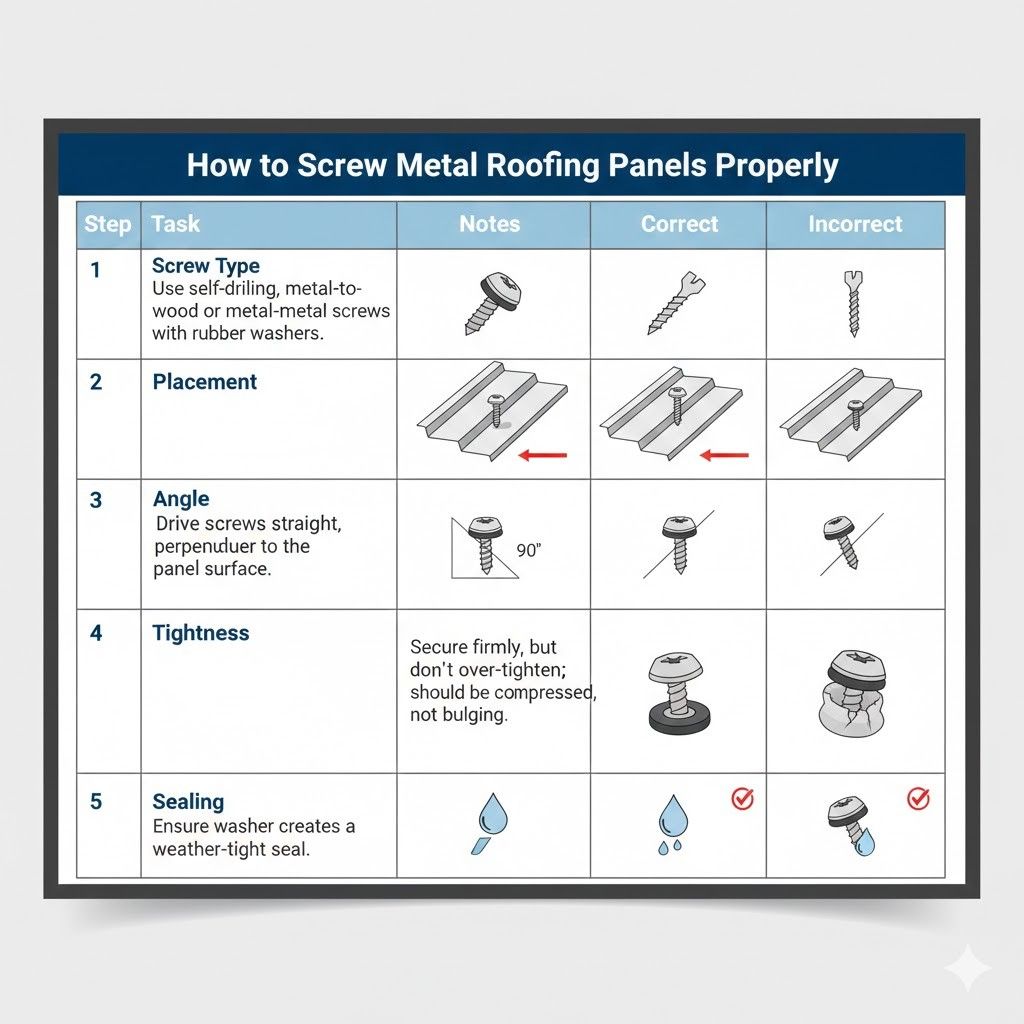
When installing metal roofing, knowing where to screw metal roof panels is crucial for ensuring a secure, durable, and leak-proof installation. The correct screw placement for metal roofing helps avoid structural issues and leaks. It’s equally important to know how to cut metal roofing safely to prevent damage and ensure a smooth, hassle-free installation. This guide will walk you through the steps for proper screw placement across various types of metal roof panels, including corrugated metal panels, standing seam panels, and aluminum vs. steel panels. We’ll also cover tips for installing around roof openings, such as vents, skylights, and chimneys.
Corrugated Metal Panels
Step-by-Step Screw Placement Along High/Low Ribs
For corrugated metal roofing, the screws should be placed along the high ribs (the peaks of the ridges) to ensure a secure hold. Here’s a step-by-step guide for screwing metal roof panels made of corrugated metal:
- Start at the End: Begin at the edge of the roof and place the first screw through the highest point of the first corrugated panel, ensuring the screw goes into the peak of the rib.
- Screw Placement Along the Ribs: Place screws through the high ribs at regular intervals, typically 12 to 24 inches apart, depending on the pitch of your roof. These screws should penetrate both the panel and the underlying roof structure, such as trusses or purlins.
- Avoid Screwing in the Valleys: Never place screws in the low valleys of the panels, as this can cause water to collect, leading to leaks.
Tips for Avoiding Leaks or Warping:
- Use screws with neoprene washers to create a watertight seal and prevent leaks around each screw.
- Don’t overtighten: Be mindful not to over-tighten screws, as this can damage the panels and cause them to warp or crush.
- Allow for expansion: Metal expands and contracts with temperature fluctuations, so ensure the screws are snug but not too tight, allowing for natural movement.
Standing Seam Metal Panels
How to Avoid Seam Damage
With standing seam metal roofing, the panels interlock along the seams, and it’s essential not to damage these seams during installation. To avoid damaging the seam, here’s what you need to do:
- Place Screws in the Clips: Instead of screwing directly into the seams, fasten screws into the clips that are positioned beneath the panels. These clips are designed to secure the panels without interfering with the seam’s locking mechanism.
- Avoid Fastening Through the Seams: Never place screws through the seams themselves, as this can compromise their integrity and lead to leaks.
Recommended Screw Types or Clips:
- Use seam clips for a secure fit. These clips are pre-designed to hold the panels without visible fasteners, giving the roof a clean, sleek look.
- For concealed fastener systems, screws should be placed in pre-drilled clip areas to avoid damaging the panels.
Aluminum vs Steel Panels
Adjusting Speed, Pressure, and Screw Spacing
When installing aluminum or steel panels, the type of metal influences both the speed of installation and the pressure required to secure the panels. Here’s how to adapt for each:
- Aluminum Panels:
- Aluminum is softer than steel, so use lower screw-driving speed to avoid stripping the threads.
- Apply moderate pressure to ensure the screws are driven in securely but without damaging the material.
- Steel Panels:
- Steel is tougher and requires more torque to drive the screws, so be sure to adjust your power tool accordingly.
- Screw spacing for steel panels may need to be closer, typically 8-12 inches apart, depending on the steel gauge and roof pitch.
Choosing Correct Screws to Prevent Stripping or Cracking:
- For aluminum panels, use stainless steel screws with neoprene washers to prevent rust and maintain a tight seal.
- For steel panels, opt for self-drilling screws, which are designed to penetrate steel without requiring pre-drilling.
Tips for Roof Openings
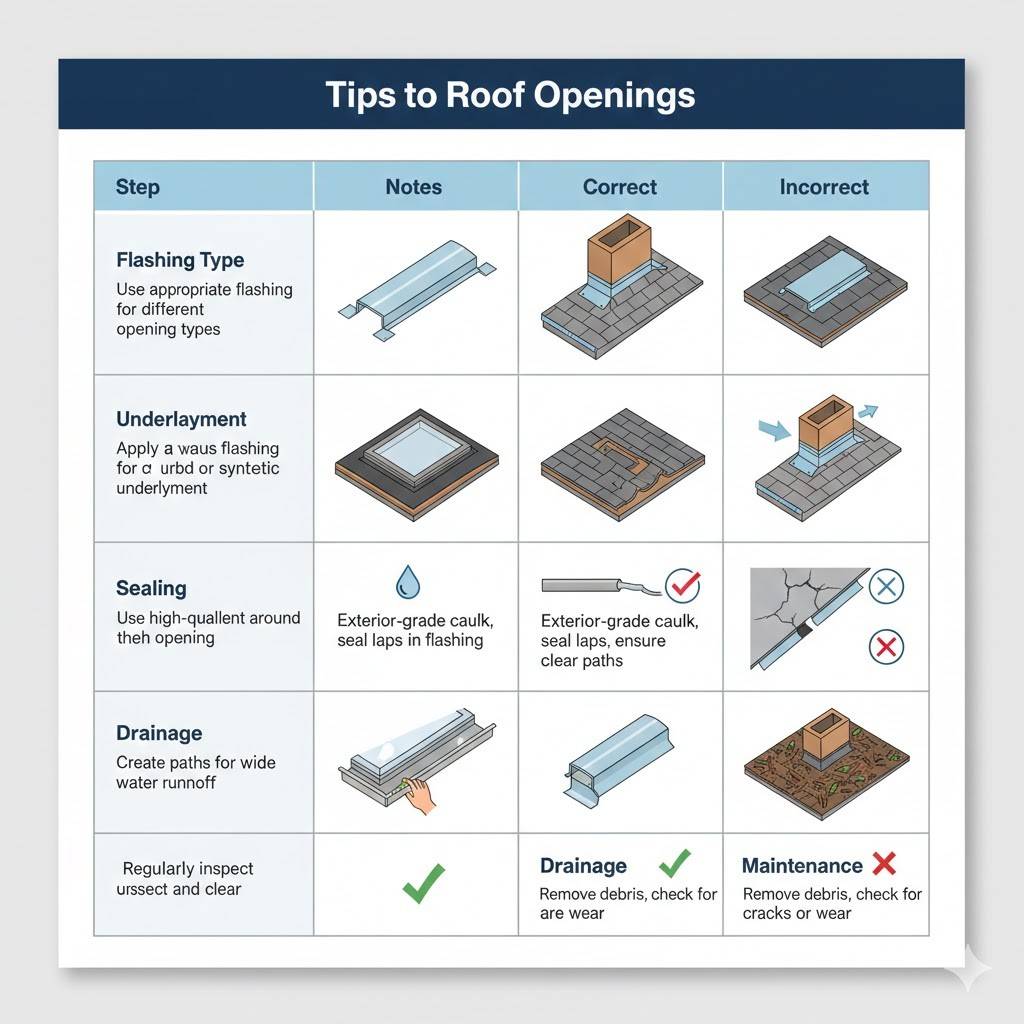
Working around roof openings like vents, skylights, and chimneys requires extra care. Here’s how to install metal roofing safely around these areas:
- Measure the Opening: Measure the dimensions of the roof opening and transfer these measurements onto the metal panel to ensure an accurate cut.
- Cutting the Panel: Use a metal saw or nibbler tool to make a clean cut around the opening. Always wear protective gear to prevent injury.
- Pre-Drill Holes for Precision: Pre-drilling holes around the edges of the opening helps guide the screws and ensures they are evenly spaced for a tight, secure fit.
- Seal the Opening: After placing the screws, use silicone caulk or rubber gaskets around the edges of the opening to create a waterproof seal and prevent leaks.
Panel Type vs Screw Location vs Fastener Type vs Recommended Tool
| Panel Type | Screw Location | Fastener Type | Recommended Tool |
|---|---|---|---|
| Corrugated Metal | High ribs of the panel, 12-24 inches apart | Self-drilling screws with neoprene washers | Cordless drill with hex bits |
| Standing Seam | Underneath the seam clips, not through seams | Seam clips or concealed fasteners | Impact driver with compatible clips |
| Aluminum Panels | High ribs, 8-12 inches apart | Stainless steel screws with neoprene washers | Cordless drill with low torque |
| Steel Panels | High ribs, 8-12 inches apart | Self-drilling screws | Impact driver with high torque |
| Roof Openings | Around the perimeter of openings | Self-drilling screws with silicone seal | Cordless drill with metal saw |
By paying close attention to where to screw metal roof panels and following the best practices for screw placement for metal roofing, you can ensure your roof is installed securely, preventing future problems like leaks or structural damage. Remember to cut metal roofing safely and handle all tools with care to make your metal roofing project both efficient and long-lasting.
Common Screw Placement Patterns and Spacing
When installing metal roofing, screw spacing for metal roofing is essential for ensuring both the stability and longevity of the roof. The best screw placement for metal roofing can help avoid issues such as leaks, warping, and rust. Understanding the right screw layout for metal panels based on the type of roof and the material will ensure a strong, secure installation. In this section, we’ll explore the most common screw placement patterns, spacing recommendations, and tips for edge and ridge screw placement.
Standard Patterns
Parallel to Panel Ribs
One of the most common screw layout for metal panels is placing the screws parallel to the panel ribs. This method ensures that the screws are driven directly into the ridges, which offer the most secure hold. Screw placement for metal roofing should align with the natural structure of the metal panel, utilizing the high ribs for fastening to the roof structure.
Staggered vs. Straight Line:
- Straight Line: When using a straight-line screw placement, the screws are spaced in a consistent pattern, either along the high ribs or across the valleys. This method provides uniformity and can be quicker for installation.
- Staggered Line: A staggered pattern places screws at slightly offset intervals. This pattern can enhance the structural integrity of the roof, especially in areas with high wind or heavy snow loads. It also helps with the expansion and contraction of the metal panels due to temperature changes.
Choosing between a staggered or straight line pattern depends on factors such as the panel material, roof pitch, and local climate. For most metal roofing installations, a straight line is common for easier and faster installation, but a staggered pattern is often recommended for high-stress areas.
Spacing Recommendations
Corrugated Metal Panels
For corrugated metal roofing, screw spacing for metal roofing plays a key role in ensuring the roof is securely fastened while preventing leaks and movement of the panels. The following are general guidelines for screw placement on corrugated panels:
- Along the Ribs: Place screws 6 to 8 inches apart along the high ribs of the panel.
- Across the Panels: For additional security, place screws 12 to 16 inches apart across the panels. This is especially important for longer panels to ensure they don’t shift or lift under wind or snow pressure.
These screw spacing for metal roofing recommendations help balance the need for a secure fit while allowing for some flexibility and expansion of the panels as they experience temperature fluctuations.
Standing Seam Metal Panels
For standing seam metal roofing, the screw placement is somewhat different due to the unique design of the panels. Instead of visible screws, standing seam roofs use clips that are fastened to the panels. The clip spacing is generally manufacturer-specific, so it’s crucial to refer to the specific guidelines provided by the manufacturer to ensure the right screw layout.
Manufacturer-Specific Clip Spacing:
- Manufacturers will specify how far apart the clips should be placed, depending on the roof’s pitch and the type of standing seam system being used. Typically, the clips are spaced at intervals of 12 to 18 inches, depending on the roof’s design and load requirements.
- Make sure to use the correct clips and fasteners as specified to maintain the roof’s integrity and avoid any potential leaks or structural issues.
Edge and Ridge Screws
Placement Near Edges to Prevent Lift
The edges of metal roofing panels are particularly susceptible to lifting in high winds. To prevent this, it’s essential to place screws near the edges of the panels. These screws provide additional stability and ensure that the panels stay securely in place, especially at the roof’s perimeter.
When installing the panels, make sure that screws are placed near the edges and ridges, as this is where the panels are most vulnerable to movement. Proper edge placement will help prevent wind uplift and ensure that the roof holds up during storms.
Ridge Caps and Overlaps
For ridge caps and overlapping panels, screws must be placed strategically to ensure the roof is sealed correctly. Ridge screws should be placed every 6 to 8 inches along the cap to prevent water infiltration and provide a tight seal. Similarly, where panels overlap, it’s important to place screws 6 to 8 inches apart, ensuring that the seams are securely fastened to prevent leaks.
Table: Panel Type vs. Recommended Screw Spacing vs. Edge Placement vs. Notes
| Panel Type | Recommended Screw Spacing | Edge Placement | Notes |
|---|---|---|---|
| Corrugated Metal | 6–8 inches along ribs, 12–16 inches across panels | Near edges to prevent lift | Neoprene washers recommended to prevent leaks |
| Standing Seam | Manufacturer-specific clip spacing | Clips under seams, edge placement as specified | Follow manufacturer’s guidelines for clip spacing |
| Aluminum Panels | 6–8 inches along ribs, 12–16 inches across panels | Near edges, ridge caps 6-8 inches apart | Stainless steel screws recommended for durability |
| Steel Panels | 6–8 inches along ribs, 12–16 inches across panels | Near edges and overlaps | Self-drilling screws ideal for fast installation |
Understanding screw spacing for metal roofing and the best screw placement for metal roofing is essential for a secure and durable roof. Following these guidelines and adapting to the specific type of metal roofing you are working with will ensure your roof performs well under various weather conditions and lasts for years to come. Always refer to the manufacturer’s instructions for clip spacing and fastener recommendations, especially for standing seam panels, to avoid installation mistakes and costly repairs.
See also What Is the Best Paint for Garage Walls?
Tools and Techniques for Tricky Cuts and Screw Locations
When it comes to cutting and screwing metal roofing, precision is key. Whether you’re dealing with tricky cuts around obstacles or need to know where to start screwing metal roofing for a secure installation, the right tools and techniques can make all the difference. From trimming metal roof panels to handling roof openings like vents and skylights, this guide will cover essential tools and tips for getting the job done right.
Using Tin Snips and Hand Tools
When to Use for Small Adjustments
For smaller trimming metal roof panels, hand tools like tin snips are ideal for making quick, precise cuts, especially in thinner metal panels. Tin snips are perfect for cutting along straight lines or around curves, and they allow you to make small adjustments without the need for power tools.
Precision vs Speed:
- Precision: Tin snips provide excellent control, making them perfect for cutting around tight spots, edges, or corners where accuracy is crucial.
- Speed: While tin snips are effective for smaller cuts, they can be more time-consuming for larger projects. For big jobs, consider using power tools to save time.
Tin snips are most useful when you need to make clean cuts or trim small sections of the roofing. However, for larger or thicker panels, it’s often best to turn to power tools for speed and efficiency.
Using Power Tools
Impact Drivers, Cordless Drills, Screw Guns
When it comes to cutting and screwing metal roofing, power tools like impact drivers, cordless drills, and screw guns offer enhanced efficiency and precision. These tools allow you to drive screws quickly and securely, while power tools like cordless drills can help with cutting or making pilot holes.
Avoiding Over-Torquing or Stripping:
- Impact Drivers: These tools deliver a burst of torque, which is ideal for driving screws into metal roofing. However, they can also strip or damage screws if used improperly. Make sure to adjust the torque settings to avoid over-torquing.
- Cordless Drills: For cutting, ensure you’re using the right bit for metal, such as a cobalt drill bit, which can cut through metal without dulling quickly.
- Screw Guns: These are designed for precise screw driving and allow you to set a consistent depth to avoid damaging the roofing material. Use a screw gun for where to start screwing metal roofing to ensure consistent screw placement and avoid over-driving.
Using the correct power tool and adjusting the settings for torque and speed will help you maintain control over the job and prevent damage to the roof panels.
Screwing Around Roof Obstacles
Vents, Skylights, Chimneys
When it comes to cutting and screwing metal roofing around obstacles like vents, skylights, or chimneys, accuracy and careful planning are crucial. These areas require extra attention to ensure there are no gaps or leaks in the roof. Here’s how to handle tricky spots:
- Pre-Drilling: Before placing screws around roof obstacles, it’s essential to pre-drill holes, especially around vents and skylights. This ensures that the screws go in straight and at the correct angle.
- Measuring and Marking Carefully: When working around vents, chimneys, or skylights, always take precise measurements before cutting or placing screws. Use a tape measure to mark the area, ensuring that cuts are accurate and screw placement is aligned with the panels.
- Cutting Around Obstacles: For tricky cuts around obstacles, use a metal saw or nibbler tool to make clean, precise cuts. After cutting, check for sharp edges and use a metal file or grinder to smooth them out before installation.
- Sealing Around the Edges: After cutting and screwing metal roofing around these obstacles, apply silicone sealant or gaskets to prevent water from entering around the edges. This is especially important around vents and chimneys where water can seep in if not properly sealed.
By carefully measuring, pre-drilling, and cutting around roof obstacles, you ensure that your roof will remain leak-free and secure.
So lets conclude it
Whether you are cutting and screwing metal roofing for a standard installation or working around tricky obstacles like vents and skylights, having the right tools and techniques is essential for achieving a secure and lasting roof. Tin snips and hand tools are great for trimming metal roof panels and making small adjustments, while power tools like impact drivers and cordless drills help speed up the process and ensure accurate screw placement. Always measure and pre-drill carefully when working around obstacles, and use proper sealing techniques to prevent leaks and damage.
With the right approach, you can achieve a precise, sturdy metal roof that will last for years to come.
Safety Tips When Screwing Metal Roofing
When working with metal roofing, safety should always be your top priority. Cutting metal roofing safely and using the right safety tips for metal roofing installation can help prevent accidents and ensure a smooth, successful project. Whether you’re handling sharp edges, using power tools, or installing fasteners, proper safety measures are essential. This section outlines the best practices to follow for a safe and efficient roofing installation.
Personal Protective Equipment (PPE)
Gloves, Goggles, Hearing Protection, Hard Hat
Metal roofing PPE is crucial for protecting yourself from injuries caused by sharp edges, flying debris, and loud power tools. Here’s the essential PPE you’ll need:
- Gloves: Protect your hands from sharp edges, metal burrs, and potential cuts while handling roofing panels and fasteners. Choose gloves with good grip and durability.
- Goggles: Wear safety goggles to protect your eyes from flying debris when cutting metal panels or using power tools.
- Hearing Protection: The noise from drills, impact drivers, and screw guns can be loud. Wear ear protection to prevent hearing damage from prolonged exposure to high noise levels.
- Hard Hat: A hard hat helps protect your head from falling debris, especially when working at heights or in areas where materials are being moved overhead.
Wearing the appropriate metal roofing PPE ensures you are fully protected from common hazards during installation.
See also How to Cut Metal Roofing Safely
Handling Sharp Edges
Deburring Edges, Lifting Panels Safely, Avoiding Cuts
Cutting metal roofing safely is essential to avoid cuts or injuries when handling sharp edges. Here are some tips for managing sharp edges during installation:
- Deburring Edges: After cutting metal panels, the edges can be sharp. Use a metal file or deburring tool to smooth out the edges and prevent accidental cuts.
- Lifting Panels Safely: Metal roofing panels can be heavy, so always use proper lifting techniques. Lift with your legs, not your back, and ask for help when lifting large panels to avoid strain or injury.
- Avoiding Cuts: Be cautious when handling the panels, especially when moving them around or securing them. Always ensure that the panels are supported properly to prevent accidental slips or cuts.
Taking care when handling sharp edges will help prevent injuries during the installation process.
Safe Use of Tools
Drill/Screw Gun Control, Correct Direction, Avoiding Slips
When cutting and screwing metal roofing, it’s crucial to use power tools properly to prevent accidents. Here are some essential safety tips for using power tools:
- Drill/Screw Gun Control: Always maintain a firm grip on the drill or screw gun to keep it steady during use. This prevents the tool from slipping and causing damage to the panels or injury to yourself.
- Correct Direction: Make sure the drill or screw gun is set to the correct rotation and speed. If the tool is going in the wrong direction, it can strip screws or cause damage to the metal panels.
- Avoiding Slips: If you’re using a power tool like an impact driver or screw gun, ensure the bit is securely fitted into the tool. A loose bit can cause the tool to slip, damaging the panel or creating a potential hazard.
Using power tools safely ensures the job is done efficiently without the risk of slips or tool malfunctions.
Safety Checklist for Metal Roofing Installation
- Wear appropriate PPE: Gloves, goggles, hearing protection, and a hard hat.
- Inspect tools before use to ensure they’re in good working condition.
- Deburr sharp edges after cutting to prevent cuts.
- Use correct lifting techniques when moving panels.
- Secure panels to prevent slipping or movement.
- Check the power tool settings (speed and direction) before use.
- Ensure steady control over drills and screw guns to avoid slips.
By following these safety tips for metal roofing installation and using the right metal roofing PPE, you’ll reduce the risk of accidents and injuries, ensuring a safer and more effective installation process.
Common Mistakes to Avoid
When installing metal roofing, it’s essential to be aware of common mistakes metal roofing screws that can undermine the effectiveness and durability of your roof. Small errors during installation can lead to costly repairs down the line. Avoiding these metal roofing errors ensures a solid, leak-free roof that will last for years. Below are some common mistakes and how to avoid them.
Skipping Measurements or Marking
One of the most common metal roofing errors is skipping proper measurements and marking screw locations before starting the installation. Incorrect screw placement can lead to gaps or misaligned panels.
Fix: Always take the time to accurately measure and mark your screw locations. Use a chalk line or a layout template for straight, evenly spaced lines, ensuring proper alignment before securing the panels.
Wrong Screw or Tool Choice
Using the wrong screw or tool can cause a variety of issues, including rust, stripping, or difficulty in securing the panels properly. Common mistakes metal roofing screws include using screws that aren’t designed for metal or mismatched tools that don’t properly secure the screws.
Fix: Ensure you are using the correct metal roofing screws for the material you are working with. Choose the right tool for metal roofing, such as an impact driver or cordless drill, and ensure they are set to the correct torque.
Ignoring Panel Preparation
Not properly preparing the metal panels before installation can lead to poor sealing, leaks, or surface damage. Cutting metal roofing mistakes like leaving sharp edges or failing to clean the panels can cause issues with the installation.
Fix: Clean and deburr the panels before installation. If you’re cutting metal roofing, use a deburring tool to smooth the edges and prevent sharp spots that could cause injury or damage.
Over-tightening or Under-tightening Screws
Screws that are either over-tightened or under-tightened are a major source of metal roofing errors. Over-tightening can crush the panels, while under-tightening can cause the screws to come loose over time, leading to leaks.
Fix: Tighten screws to the recommended torque without over-tightening. Use a screw gun with depth control for consistent screw placement.
Mistake vs Consequence vs Fix
| Mistake | Consequence | Fix |
|---|---|---|
| Skipping measurements or marking | Misaligned panels, gaps, leaks | Measure and mark screw locations before starting |
| Wrong screw or tool choice | Stripped screws, rust, poor hold | Use the correct screw and tool for metal roofing |
| Ignoring panel preparation | Leaks, poor seal, injury from sharp edges | Clean and deburr the panels before installation |
| Over-tightening or under-tightening screws | Warping, loose screws, leaks | Use proper torque and screw guns with depth control |
Maintenance and Longevity of Screwed Metal Roof Panels
Proper metal roofing maintenance is essential for ensuring your roof remains durable and performs well for years. Regular checks and maintenance can prevent issues like rust and leaks, while prolonging the life of your roof.
Deburring and Edge Treatment
Sharp edges left after cutting metal roofing can lead to rusting over time and increase the likelihood of injury. Deburring the edges properly after installation is essential for maintaining both safety and durability.
Fix: Use a deburring tool or metal file to smooth the edges of panels. Treat any exposed edges with a rust-inhibiting solution to prevent corrosion.
Checking and Tightening Screws
Over time, the screws used in screwing metal roofing may loosen due to weather conditions, thermal expansion, or settling. Screw maintenance for metal roofing includes regularly checking and tightening any loose screws to maintain a watertight seal.
Fix: Periodically inspect the screws for tightness and corrosion, especially after extreme weather. Use a screw gun to tighten any loose screws without damaging the panels.
Protective Coatings and Rust Prevention
Rust is a common issue with metal roofs, particularly if the roofing material is exposed to moisture or harsh environmental conditions. Preventing rust is essential for metal roofing maintenance and the overall longevity of the roof.
Fix: Apply a rust-preventative coating or paint to exposed metal areas to protect them from rust. Regularly inspect and touch up any damaged areas where the coating has worn off.
Frequently Asked Questions About Screwing Metal Roofing
If you’re unsure where to screw metal roofing or how to ensure proper screw spacing for metal roofs, this section answers some of the most frequently asked questions about the installation process, helping you avoid common pitfalls and ensure a secure roof.
Where Do I Place Screws on Corrugated Metal Roofing?
The best location for screws on corrugated metal roofing is along the high ribs (peaks) of the panel. This is the most secure part of the panel and will help prevent leaks.
Can I Screw Metal Roofing into Wood or Metal?
Yes, you can screw metal roofing into both wood and metal. For wood, use wood screws, and for metal, use self-drilling screws for metal roofing. Ensure you select the correct screw type for the material to ensure a strong connection.
How Many Screws per Panel Are Needed?
Typically, screws should be placed every 12 to 24 inches along the ribs of the panel. The number of screws required will depend on the length and type of the panel, as well as the pitch of the roof.
Should Screws Go in High or Low Parts of Panels?
For corrugated panels, screws should go in the high ribs of the panel. For standing seam panels, screws are placed in the clips under the seams to avoid damaging the seams.
How to Prevent Leaks Around Screws?
To prevent leaks around screws, always use self-drilling screws with neoprene washers. These washers provide a watertight seal around the screw, preventing water from entering through the screw hole.
Final Thoughts on Where to Screw Metal Roofing
Correct screw placement is crucial for the durability and effectiveness of your metal roof. Whether you’re using self-drilling screws for metal roofing or ensuring proper screw spacing for metal roof panels, following the best practices outlined in this guide will help you achieve a secure, long-lasting roof. Here are a few key takeaways to remember:
Key Takeaways
- Correct tool selection ensures accuracy: Choosing the right tool, such as a screw gun or impact driver, guarantees precise screw placement and avoids damage to panels.
- Proper measurement and marking prevent mistakes: Always measure and mark screw locations before installation to ensure even spacing and alignment.
- PPE and safe techniques prevent injury: Wear the proper metal roofing PPE, like gloves and goggles, and use safe techniques when working with power tools and cutting metal.
- Panel type affects screw location and spacing: Adjust screw placement depending on the type of panel, ensuring the right amount of hold for different materials.
- Post-install inspection prevents leaks and extends roof life: Check for loose screws and rust over time, and apply protective coatings to maintain your roof’s integrity.
Quick Reference – Panel Type, Screw Type, Location, Tool
| Panel Type | Screw Type | Screw Location | Tool |
|---|---|---|---|
| Corrugated Metal | Self-drilling screws with neoprene washers | High ribs, 12–16 inches apart | Cordless drill, screw gun |
| Standing Seam | Clips and concealed fasteners | Under seams | Impact driver, screw gun |
| Aluminum Panels | Stainless steel screws with neoprene washers | High ribs, 8–12 inches apart | Cordless drill, screw gun |
| Steel Panels | Self-drilling screws | High ribs, 8–12 inches apart | Impact driver |
By following these guidelines, you can ensure a properly installed and durable metal roof that will last for years.